Effortless Image Transfer for iPhone & Mac Users - Comprehensive Tutorial by DearMob Experts

Effortless Image Transfer for iPhone & Mac Users - Comprehensive Tutorial by DearMob Experts
Disclaimer: This post includes affiliate links
If you click on a link and make a purchase, I may receive a commission at no extra cost to you.
How to Transfer Photos between iPhone and Mac
DearMob iPhone Manager lets you transfer photos to or from iOS and iPadOS devices in a fast, easy, and safe manner. Whether they are Live Photos, ProRaw, burst photos, 4K HDR photos, or HEIC, all kinds of iPhone photos can be imported or exported to the iPhone in original resolution.
Transfer Photos from iPhone, iPad, or iPod Photos to Mac
In DearMob,
Bulk transfer all or selected photos.
Preserve the original picture quality and album structure.
A Live Photo is converted to one video and one image file.
An HEIC photo can be exported as a JPG for viewing on Mac.
An edited photo is exported in 2 versions: original and edited.
1. Launch DearMob iPhone Manager and connect your iOS/iPadOS device.
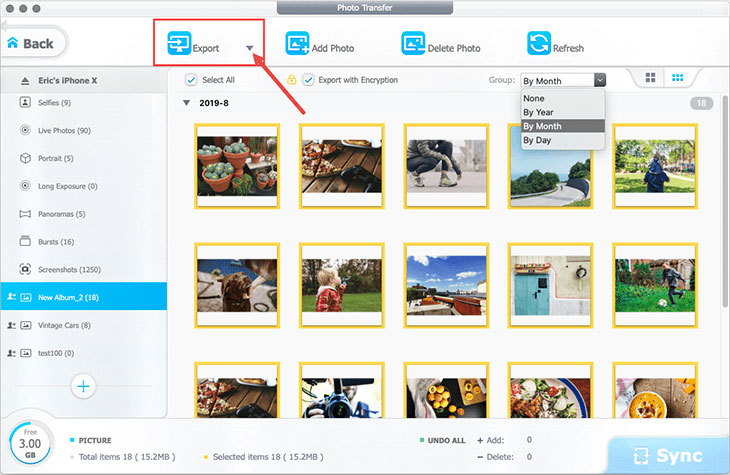
2. Hit Photo Transfer and select the photo(s) you want to transfer to Mac. Click Export and then you can find the photos on the local drive of your computer.

![]() Tips:
Tips:
- Change view by grid size or group photos by date to better transfer and manage photos.
- Tick Export with Encryption to encrypt the exported photo files .
- For photos tagged with a cloud icon, follow this tutorial to save the photos to your device first and continue to export them using DearMob.
Preview Photos by Albums
DearMob iPhone Manage allows you to preview photos by album folders. There are favorites, Selfies, Screenshots, Panoramas, Bursts, Hidden, Recently Deleted, and folders created by different apps such as Snapchat, Instagram, Snapseed, etc.
- iPhone Manager version 5.8 and above support previewing the hidden Photos album. Photos in the Hidden album will not show up in the Camera Roll album.
- iPhone Manager version 6.5 and above support previewing photos that are directly imported from cameras, flash cards and other external drives into iPhone > Photos app.
![]() More About the External Drive Album
More About the External Drive Album
- You will see an External Drive album on the left panel inside the Photos module in DearMob. If your iPhone doesn’t contain imported photos, you won’t see the external drive album.
- The External Drive album in DearMob is different from the Imports folder on iPhone > Photos. The Imports folder contains photos via AirDrop, cameras, flash cards and other external drives, while the External Drive album in DearMob doesn’t show AirDropped photos.
- You can find AirDropped photos in DearMob > Photos > Camera Roll. The photos received via AirDrop are organized based on their creation date. For example, if a friend AirDrops you a photo today that was taken a month ago, you’ll need to locate the photo in last month’s section of your camera roll in the Photos app.
Transfer Photos from Mac to iPhone, iPad, or iPod Photos
In DearMob,
Photo Formats include .jpg, .jpeg, .png, .gif, .bmp, .tiff, and .heic.
Import HEIC to iPhone.
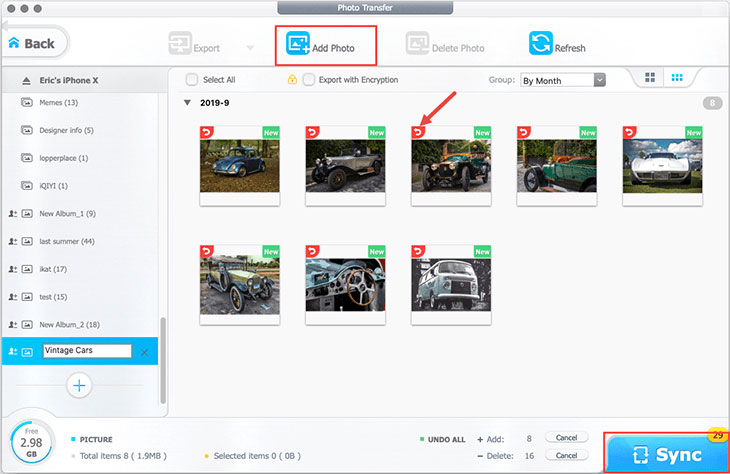
Undo Option allows you to click the red curve icon or cancel button for avoiding the wrong import before Sync.
1. Launch DearMob iPhone Manager and connect your iPhone to your computer.
2. Click Photo Transfer. Scroll down on the album list to find the + icon. Click it to create a new album. Open the new album.
3. Click Add Photo and select the photos or photo folders that you want to import from Mac to iPhone. Alternatively, drag the photos or photo folders into the large blank area.
4. Click the Sync button to start transferring photos from Mac to iPhone.

![]() Tips:
Tips:
- Name the album as you like.
- As per iOS/iPadOS system design, you need to add photos to custom albums when importing photos from PC/Mac to iDevice. System-generated albums like Camera Roll, Favorites, and Screenshots are locked in this scenario.
- After importing photos to iPhone, find them in Photos App > Albums > From My Mac (the naming can be different for different iOS versions). You can also find the imported photos in the Camera Roll— in the section of the year when it was created.
Delete photos from your iPhone, iPad, or iPod on Your Mac
In DearMob,
Bulk delete all or selected photos from more than one album.
Undo option for preventing you from deleting some photos by mistake.
Cancel before Sync to revoke all deletions.
Preview photos in large icons before deleting them.
1. Launch DearMob iPhone Manager and connect your iDevices to the Mac.
2. Select the photo(s) that you want to delete and click Delete Photo to confirm.
3. Click Sync to enable DearMob to start deleting the selected photos.

![]() Tips:
Tips:
- Hit Select All to select all photos in an album.
- To select multiple adjacent photos in an album, click the first photo, press and hold down the Shift key on the keyboard, and then click the last photo.
- All photos between the first and last photo will be selected.
Gaotags: Keep or Remove Photo Location Data
From DearMob iPhone Manager v6.2 and onwards, there is an option to remove photo location information from EXIF metadata.
Note: It only works for macOS 10.13 (macOS High Sierra) and higher versions to remove photo location data.

- By default, the option is turned off. When you export photos, the embedded location data in the photos will be kept.
- When toggled on, DearMob iPhone Manager will remove photo location data when exporting photos from iPhone to computer.
![]() What is the photo location data?
What is the photo location data?
- Location data stores the geographical information about where your photo is taken. It is also known as GPS data, geolocation data, or geotags. It is stored in the EXIF metadata of the photo file.
- iPhones and other smartphones with GPS capabilities can record the latitude and longitude coordinates of the device’s location at the time the photo was captured.
![]() Which setting allows iPhone to add location data to my photos?
Which setting allows iPhone to add location data to my photos?
On iPhone: Settings > Privacy > Location Services > Camera.
- If you select Never, iPhone won’t embedded location data when taking photos.
- Otherwise, iPhone will added location data to photos.
Frequently Asked Questions
How to Check Your iPhone Photos in Large Icons on a PC?
To display your iPhone photos in the large icons view, simply click the 4-square icon located in the top right of the Photo Transfer panel.
Can It Retain the Actual Capture Date When Exporting iPhone Photos?
Yes. The Windows version of DearMob iPhone Manager won’t change the original creation dates of your photos during export.
Also read:
- [Updated] 2024 Approved Groundbreiting Recording Solutions for Environmental Films
- [Updated] In 2024, Enhance Engagement with Squared-Up Social Media Content
- [Updated] In 2024, Transform Your Content to Stardom Studio Guide
- Easy-to-Follow Instructions for Downloading Lenovo X1 Carbon Drivers on Windows 10 and 7
- How to Transfer Apps from Lava Agni 2 5G to Another | Dr.fone
- Initiate Your Journey A Straightforward NFT Blueprint
- Step-by-Step Guide: Clearing Your Shopping Records From iPhone
- The 6 Best SIM Unlock Services That Actually Work On Your Tecno Phantom V Fold Device
- Top 3 Secure Methods for Completely Erasing Your iPhone's SMS History
- Ultimate Guide: Mastering Deletion of Your iCloud Email Address
- Ultimate Tutorial: How to Erase Music Files in iTunes for Desktop Users
- Title: Effortless Image Transfer for iPhone & Mac Users - Comprehensive Tutorial by DearMob Experts
- Author: Daniel
- Created at : 2025-02-13 03:20:49
- Updated at : 2025-02-20 01:52:54
- Link: https://os-tips.techidaily.com/effortless-image-transfer-for-iphone-and-mac-users-comprehensive-tutorial-by-dearmob-experts/
- License: This work is licensed under CC BY-NC-SA 4.0.