
How to Mount iPhones and iPads as External Storage on Windows - A Step-by-Step Guide
How to Mount iPhones and iPads as External Storage on Windows - A Step-by-Step Guide
Disclaimer: This post includes affiliate links
If you click on a link and make a purchase, I may receive a commission at no extra cost to you.
How to Mount iPhone/iPad as a Flash Drive
In DearMob iPhone Manager , you can mount your iPhone or iPad as a flash drive. That is to say, any of your files, even including the documents that are not incompatible with Apple can be saved to your iPhone/iPad, and exported to another computer whenever you need. Compared with cloud storage, this method is safer, quicker, and independent of network connection.
Store Files from a Computer to iPad/iPad Flash Drive
This PC-based iPhone manager lets you:
Mount your iPhone or iPad as a portable flash drive or a transfer station;
Store PPT, PDF, HTML, DOC, Word, Page, and anything on your iPhone/iPad;
Add Apple-incompatible files to your iDevice without installing any extra apps thereon;
No worries about those files on iDevices being noticed and viewed by others.
1. Launch DearMob iPhone Manager and connect your iPhone or iPad to the source computer (the one which the files are going to be exported from).
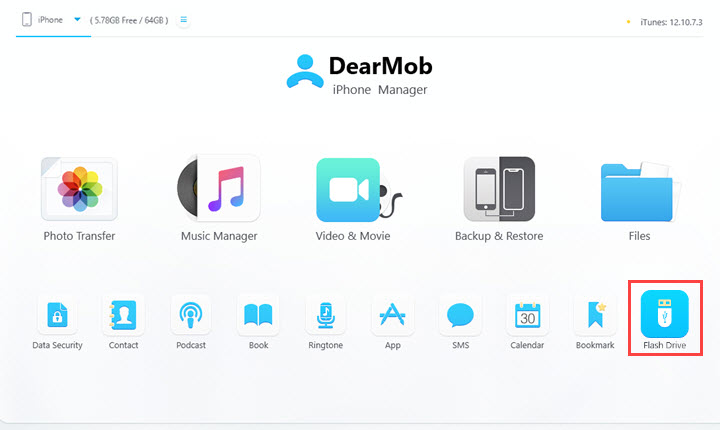
2. Click Flash Drive on the main interface.
3. Click on Add File and choose Add File or Add Folder on the drop-down list.
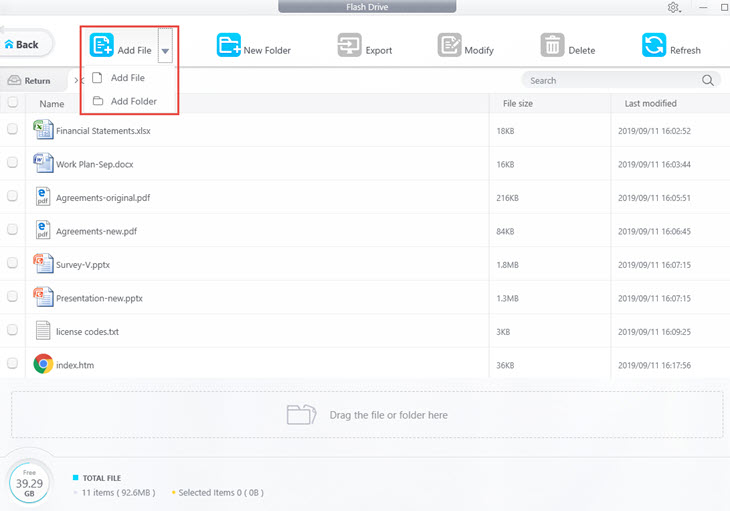
4. Browse on your computer and add the files you need to transfer. Click Open and you’ll see it completed in less than a second. The files are then all added to your iPhone/iPad.
![]() Tips:
Tips:
- You can also drag the file or folder to the empty place to add.
- You can create a new folder by clicking “New Folder”. Name it and click “OK”.
Export Files from iPhone/iPad Flash Drive to Computer
In DearMob, all the files you’ve added to your iOS device as a flash drive can be exported to a Windows or Mac computer (that has DearMob iPhone Manager installed) easily.
1. Connect your iPhone to the computer.
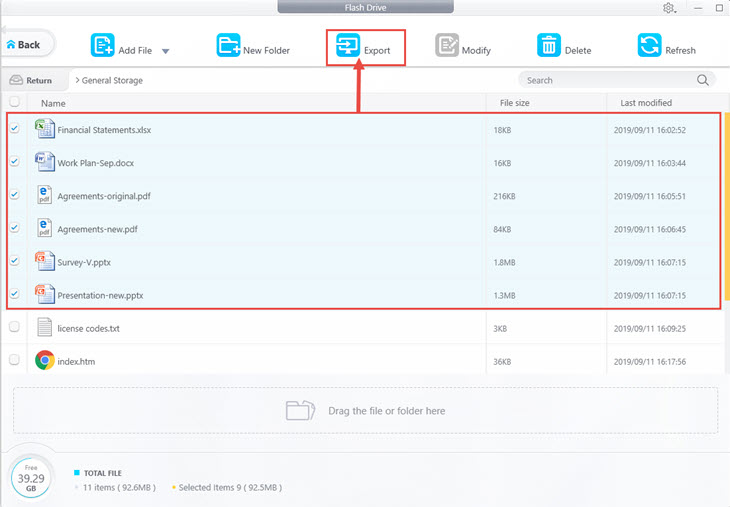
2. On the Flash Drive interface, choose the file(s) or folder(s) you want to unload from your iPhone/iPad.
3. Click Export.
![]() Tips:
Tips:
- In this section, you can export files that were added to your iPhone via the Flash Drive feature in DearMob iPhone Manager.
- While for other files stored in iPhone storage, you can find them in other features in the main UI, such as Photo Transfer, Music Manager, Video & Video, Files, Podcast, Book, etc.
Modify or Delete Files on iPhone/iPad Flash Drive
In DearMob, those files that have been stored on your iOS device can be renamed or deleted on the computer.
1. Open Flash Drive in DearMob iPhone Manager.
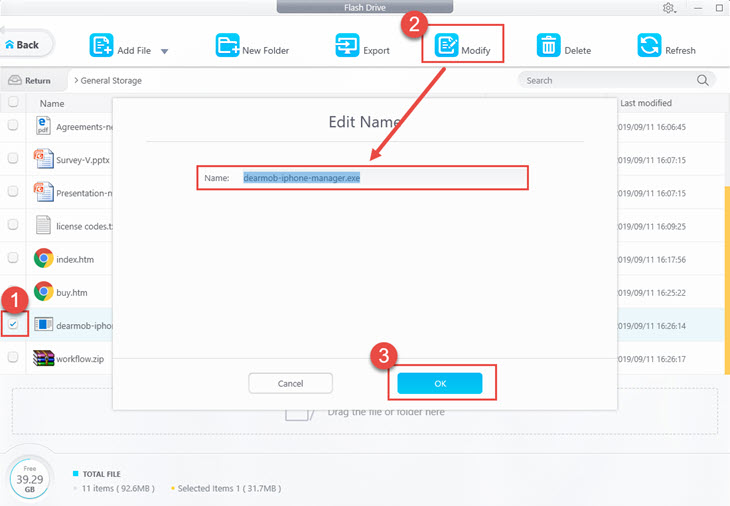
2. Tick one or more files you want to manage.
3. Click Modify on the top to change the name of the file. Click Delete on the top if you want to delete the added files.
4. Click OK to confirm the changes. Also, you can click Cancel to undo it.
Frequently Asked Questions
How can I use my iPhone as a USB without iTunes?
When you use DearMob iPhone Manager, your iPhone can be taken as a USB to store files. Then you can add, export, and manage files on iPhone without iTunes.
How do I get my computer to recognize my iPhone as a drive?
After connecting your iPhone to your computer and choosing to trust this computer, your iPhone will show up as an internal storage drive. Then you can copy photos and videos from the drive to your computer. However, it cannot access other files or add files to your iPhone storage drive. If you want more options, DearMob iPhone Manager can make your iPhone a real flash drive.
Also read:
- [New] 2024 Approved An In-Depth Review of DJI Drone Model 3'S Performance
- [New] Decoding the Legal Labyrinth of Sharing Music on Instagram for 2024
- [New] Precision Viewing at a Glance Quick Minigame Tips for 2024
- [New] Superior Internet Audio Devices Reviewed & Ranked 2023 for 2024
- 2024 Approved Hashtags in Harmony Twitter and TikTok's 10 Viral Vids
- 2024 Approved Textual Transformations - Discovering the Best Video Effects
- Brief Basslines & Rhythms Video Soundscapes
- Haunting Hilarity Hub for 2024
- Quick & Easy Rooting Methods for Your Kindle Fire: A Comprehensive Tutorial
- Quick Fixes to Resolve Non-Delivery of Texts or Emails – Understand and Address Common Hurdles
- Solve the 'Error 4504: Message Not Found' On Your Android Device - Easy Fix Guide
- Step-by-Step Tutorial on Setting Up/Accessing/Restoring/Removing a Samsung Account & Effective Strategies for Backup & Restoration of Your Personal Information
- Step-by-Step Tutorial: Activating and Using Smart Lock Functionality in Android Systems
- What is Geo-Blocking and How to Bypass it On Itel P55? | Dr.fone
- Title: How to Mount iPhones and iPads as External Storage on Windows - A Step-by-Step Guide
- Author: Daniel
- Created at : 2025-02-13 02:46:33
- Updated at : 2025-02-19 22:45:38
- Link: https://os-tips.techidaily.com/how-to-mount-iphones-and-ipads-as-external-storage-on-windows-a-step-by-step-guide/
- License: This work is licensed under CC BY-NC-SA 4.0.