
Integrating Your Apple Calendar with Windows via DearMob - Comprehensive Guide for Cross-Platform Syncing
Integrating Your Apple Calendar with Windows via DearMob - Comprehensive Guide for Cross-Platform Syncing
Disclaimer: This post includes affiliate links
If you click on a link and make a purchase, I may receive a commission at no extra cost to you.
How to Manage iOS Calendars on Windows
It is easily to get freaked out with the dated arragements alerting everyday. And to go back to calendar events that were created years ago sounds tedious enough, and then to delete and manage them one-by-one on your iPhone will drive you crazy as all the tremendous workload is to be done on your tiny screen.
With the assist of DearMob iPhone Manager , you can manage your obsolete calendar events on Windows PC, and add/delete, import/export and share/sync them in a blink of your eyes.
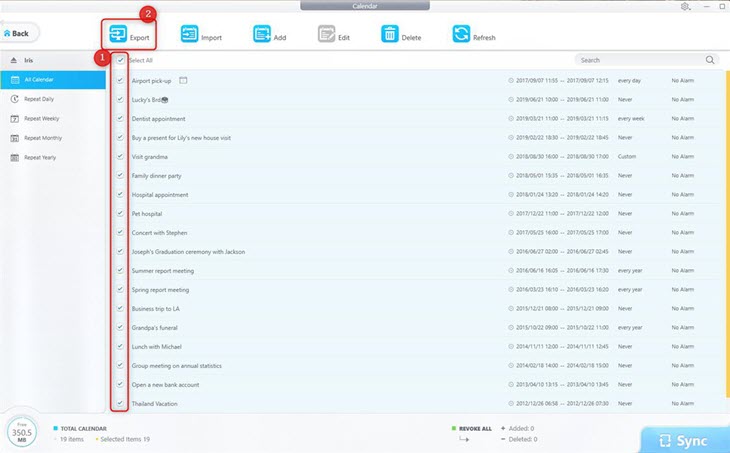
Export iPhone, iPad, or iPod Calendars to Windows PC
In DearMob,
All calendar events can be exported to Windows PC and contained as .plist files.
You can easily set the events to repeat daily/weekly/monthly/yearly using the Calendar editing feature.
1. Select the calendar event(s) you want to export on Windows PC.
Quick access to select all calendar events under All Calendar, or you can locate your special event tabs marked by Repeat Daily, Repeat Weekly, Repeat Monthly or Repeat Yearly on the left side.
2. Export the selected calendar events by hitting the Export icon.
![]() Tips:
Tips:
- Click the Refresh icon to get the real-time Calendar info from your iDevice.
- Never click the Refresh icon before you Sync all the changes to your iDevice. Once you hit the Refresh icon before synchronizing the data on your iDevice, all the efforts you have done will be erased with this click. So make sure that you hit the Sync button on the bottom right corner each time a new move has been made.
Import iPhone, iPad, or iPod Calendars from Your Windows PC
In DearMob,
All calendar events can be exported to Windows PC and contained as .plist files.
You can easily set the events to repeat daily/weekly/monthly/yearly using the Calendar editing feature.
1. Click the Import icon on the top medium functional block, then the window containing all exported *.plist files will pop up. Choose the file(s) and confirm with a Yes.
2. Hit the Sync button to transfer Calendar from the computer to your iDevice.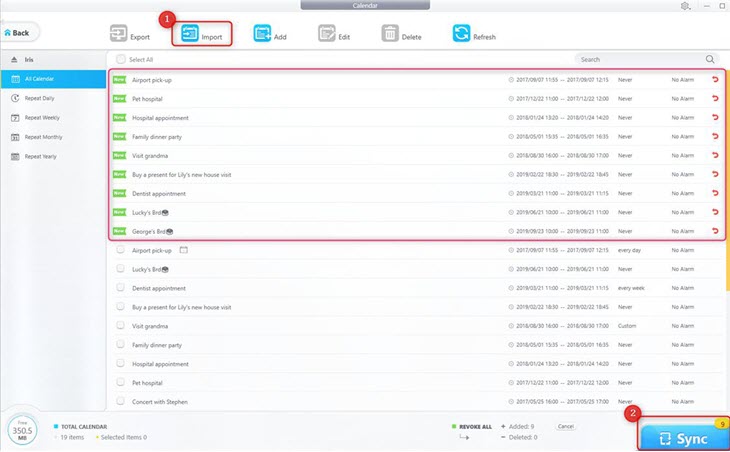
![]() Tips:
Tips:
- Click the red curved icon on the very left corner to undo the process if you accidentally input the wrong file(s).
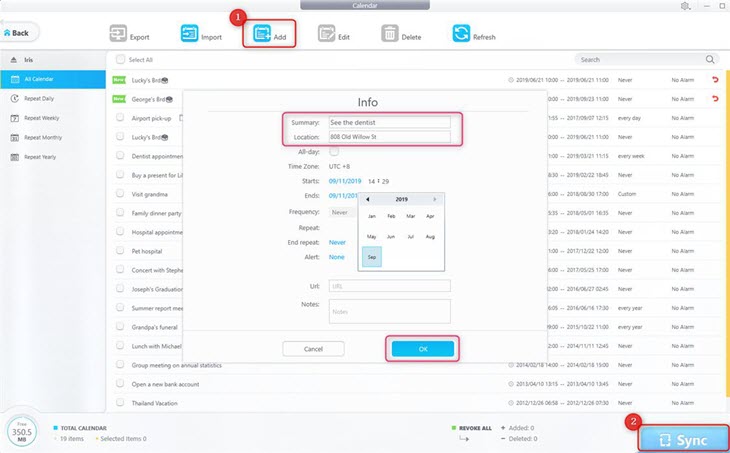
Add iPhone, iPad, or iPod Calendars to Your Windows PC
In DearMob,
Add a new calendar event will be much easier with a clearer and wider interface so as to edit the existed calendar events with high efficiency.
1. Click the Add icon on the top of the interface.
2. Set up the calendar easily.
You can edit Summary, Location, Alter Date, Repeat Type, URL, Notes and so on.
3. Hit the Sync button and transfer the newly added calendar event(s) to your iDevice.
![]() Tips:
Tips:
- Click the red curved icon on the very left corner to revoke the info if you accidentally type in the wrong words.
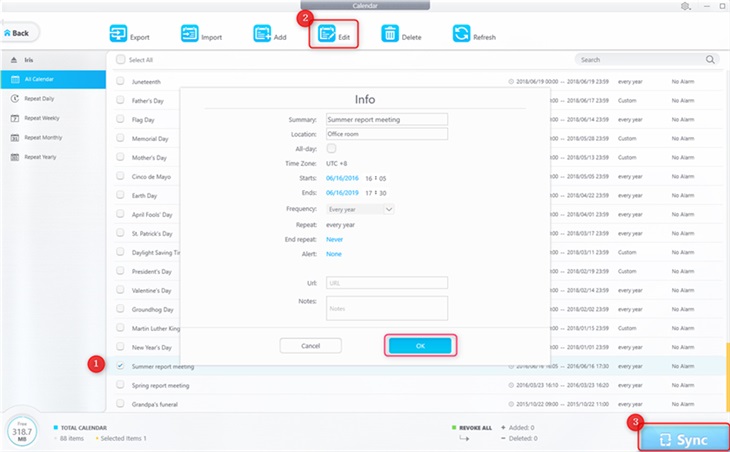
Edit iPhone, iPad, or iPod Calendars on Your Windows PC
In DearMob,
Edit a new calendar event will be much easier with a clearer and wider interface.
1. Click the Edit icon, and modify Calendar info: Summery, Location, Alert Time, Repeat Type, URL and Note.
2. Hit the Sync button and transfer the modified calendar event(s) to your iDevice.
![]() Tips:
Tips:
- You can click the red curved icon to undo editing.
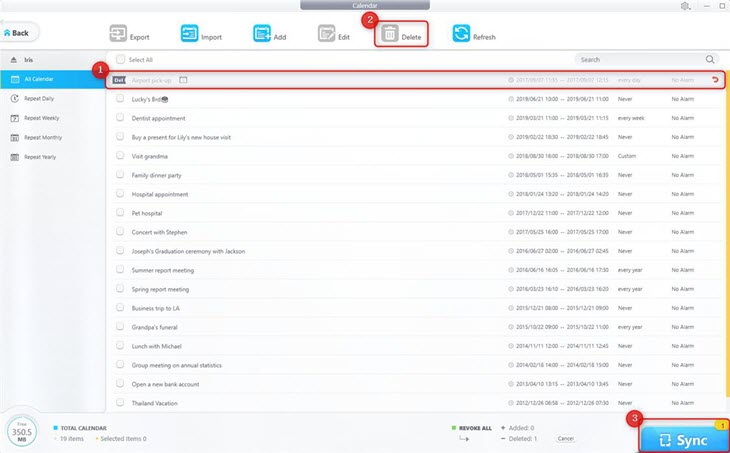
Delete iPhone, iPad, or iPod Calendars on Your Windows PC
In DearMob,
To delete the unwanted calendar event(s), you will never have to go back and deal with the massive events one-by-one. All you need to do is to click your mouse once.
1. Select the calendar event you want to get rid of from your iDevice.
2. Click the Delete button on the top of the interface.
3. Hit the Sync button to synchronize the deletion to your iDevice.
Also read:
- [New] Next-Gen Content Craze 2024
- [Updated] 2024 Approved Chromebook Pitch and Timbre Control Guide The Leading Online Speech Modifiers
- [Updated] 2024 Approved Elevate Audience Engagement Top Hashtag Strategies Revealed
- [Updated] 2024 Approved Next-Gen Webcams Top 5 Featuring Premium Audio Capabilities
- Clearing Cache & Unnecessary Files: A Guide to Boosting iPhone Storage (Compatible with iOS 12)
- Comprehensive Steps for Hardware & Software Restart on Every iPhone Model
- Craft a Tailored, Clutter-Free Windows 11 Environment
- Fix Your Gaming Lag: Master High FPS Solutions
- New Multiple Ways How To Remove iCloud Activation Lock From your iPhone SE (2020)
- Remove Device Supervision From your Apple iPhone 15 Pro | Dr.fone
- Step-by-Step Guide: Deleting Safari Browser History & Cookies From Your iPhone
- Step-by-Step Guide: Erasing Your iPhone's Phone Logs
- Step-by-Step Tutorial: Remove iPhone Files Forever - Proven Strategies Inside!
- The Complete Tutorial on Removing WhatsApp Chats & Messages for the Year 2024
- Title: Integrating Your Apple Calendar with Windows via DearMob - Comprehensive Guide for Cross-Platform Syncing
- Author: Daniel
- Created at : 2025-02-19 02:39:18
- Updated at : 2025-02-19 16:25:57
- Link: https://os-tips.techidaily.com/integrating-your-apple-calendar-with-windows-via-dearmob-comprehensive-guide-for-cross-platform-syncing/
- License: This work is licensed under CC BY-NC-SA 4.0.