
Secure Your Apple Ecosystem: The Complete Tutorial for Activating Passkeys Across iPhone, iPad & Mac

Secure Your Apple Ecosystem: The Complete Tutorial for Activating Passkeys Across iPhone, iPad & Mac
Quick Links
- What Is a Passkey?
- Which Apps and Websites Support Passkeys?
- How to Create Passkeys on an iPhone, iPad, or Mac
- How to Sign In to Your Accounts with Passkeys
- Why You Should Be Using Passkeys Whenever Possible
Key Takeaways
- Passkeys are a password-free authentication method that uses Face ID, Touch ID, or your passcode to log in to apps and services.
- Major websites like Google, Amazon, and Microsoft support passkeys already, offering improved security and a hassle-free login experience.
- To use passkeys, update to the latest OS and enable iCloud Keychain. Then go to Settings > Passwords > Password Options and turn on “Autofill Passwords and Passkeys.”
Nobody likes passwords, understandably so. They’re tricky to come up with and even trickier to remember, but a new authentication method called “passkeys” could make them a thing of the past. Here’s how you can use passkeys to enjoy a password-less experience on your iPhone, iPad, or Mac.
What Is a Passkey?
Simply put, a a passkey is a kind of password that you don’t have to enter, protect, or remember. Sounds great, right? But then, how do you authenticate yourself when signing in to your accounts? Well, by simply unlocking your device.
On a more technical level, passkeys are built on the Web Authentication standard and use public key cryptography. That means when you create a new account with a website or app, your device will create a pair of cryptographic keys. These keys are incredibly complex and unique to your account. The public key is stored on the website while the private key, which is the real deal, lives securely on your device.
When you log into your account, the website requests to see the private key on your device and checks if it works with the public keys. You authenticate the request using your screen lock method—Face ID , Touch ID , or a passcode—and as soon as you do that, you’re get signed in to your account. So what used to require entering a username, password, and two-factor authentication code gets reduced to the simple act of unlocking your device.
Which Apps and Websites Support Passkeys?
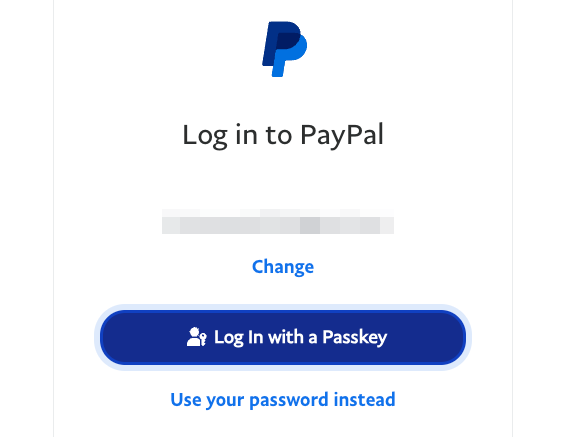
While passkeys are clearly the future, they’re still in the early days. It will take a while to fully transition to the promised password-less web. But the good news is that adoption is picking up steam, and you can already try out the passkey login experience on many of your favorite websites, including Google, Amazon, Best Buy, Adobe, Microsoft, Instacart, Nintendo, and PayPal.
1Password’s passkey directory keeps track of all the websites, apps, and services that currently offer passkey login. We should continue to see more and more services adopting passkeys as they grow in popularity. That said, we’re not expecting passwords to go away completely anytime soon, given just how deeply ingrained they’re in our digital lives. Passwords and passkeys will continue to co-exist for the foreseeable future.
How to Create Passkeys on an iPhone, iPad, or Mac
Getting started with passkeys on your iPhone, iPad, or Mac is easy. That said, you’ve to get a few things in place:
- Enable iCloud Keychain on your device, as this is where all your passkeys will be stored.
- Update to iOS 16, iPadOS 16, macOS Ventura, or tvOS 16, or later.
- Make sure passkeys are supported by your browser. If you’re using Safari or Chrome, you’re golden.
How to Enable Passkeys
First things first. Navigate to Settings > Passwords > Passwords Options. On a Mac, open the System Settings to find this.
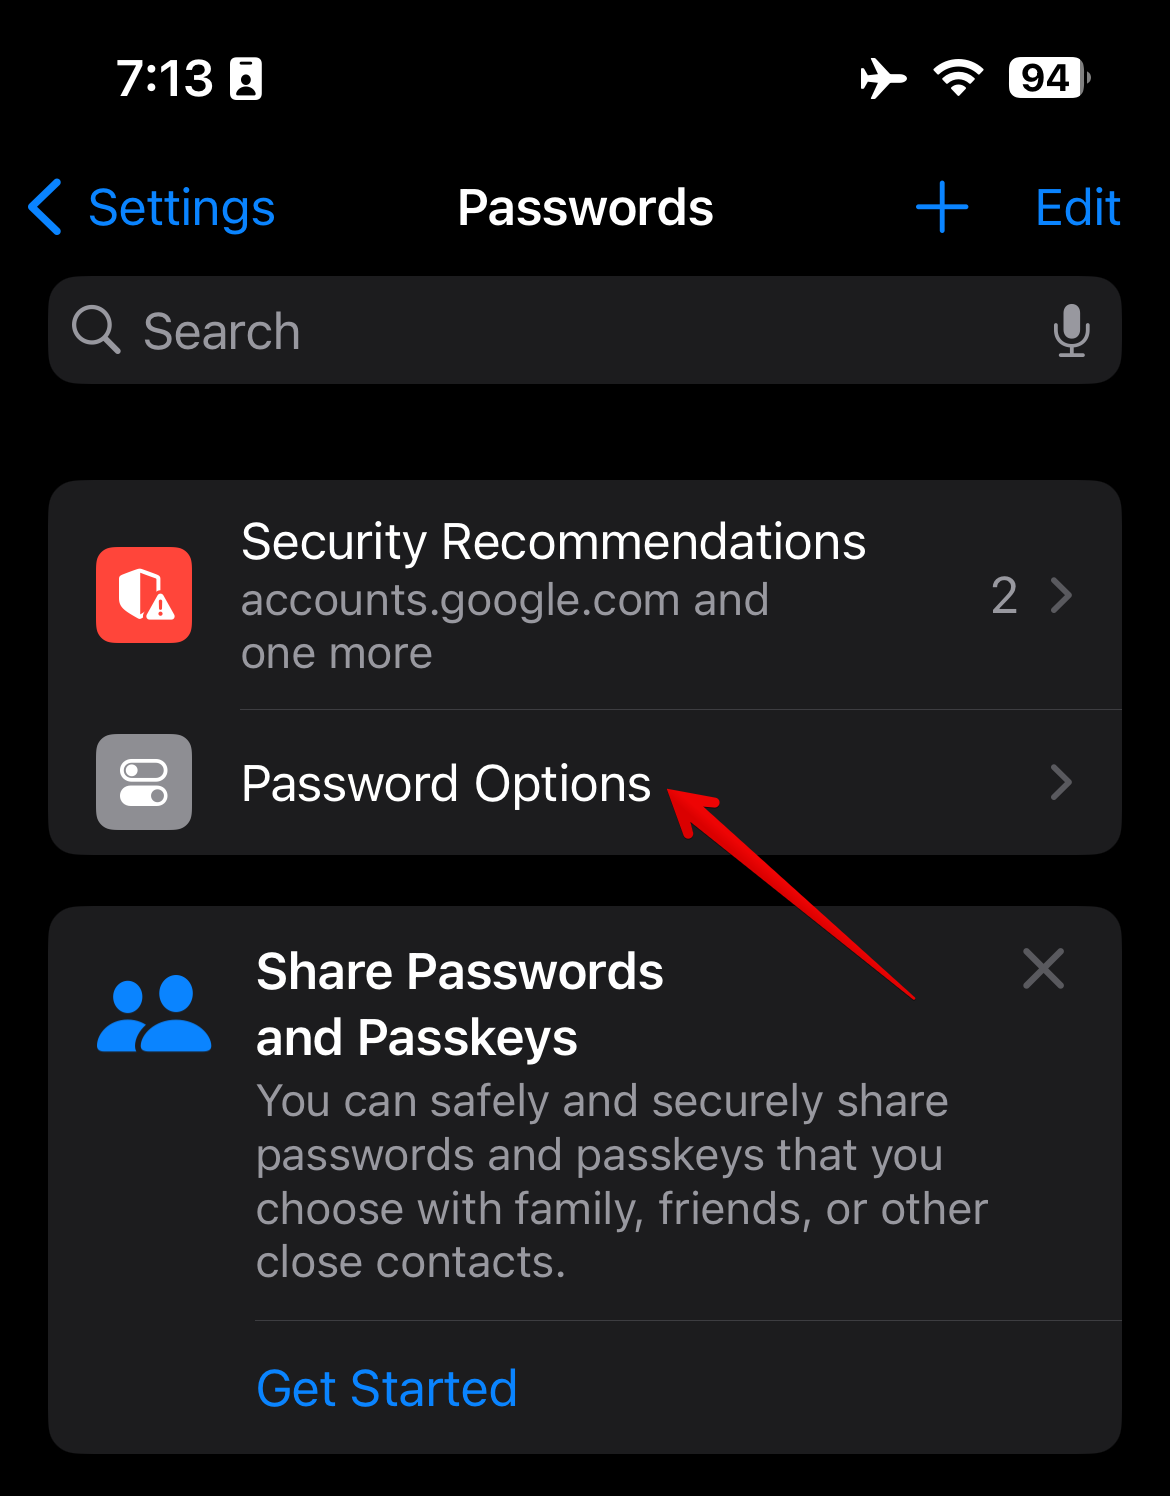
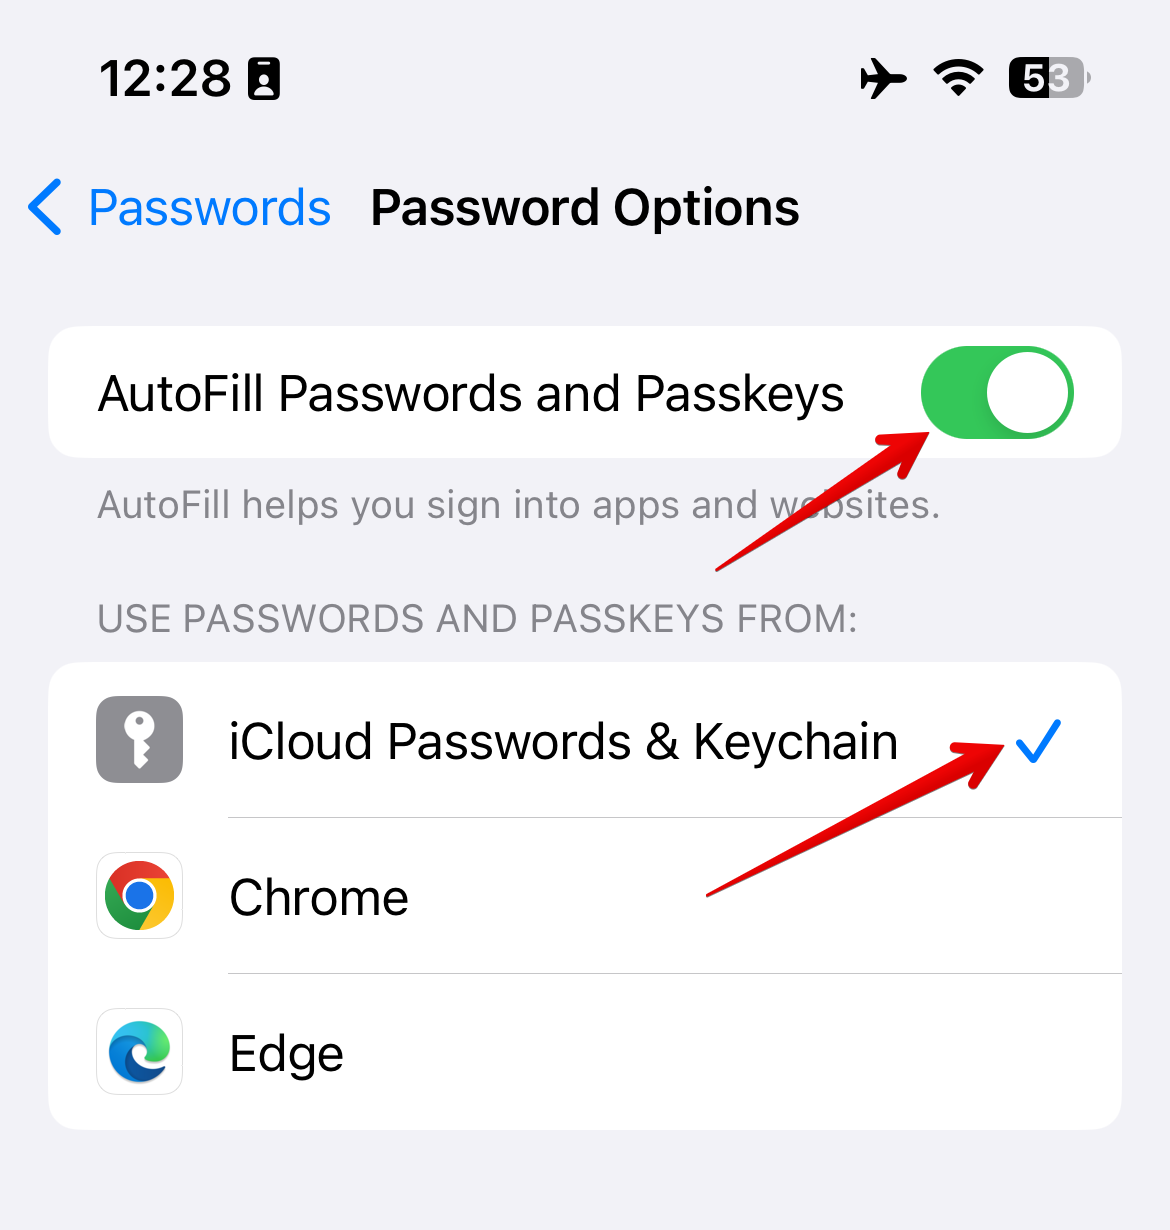
Make sure the “Autofill Passwords and Passkeys” toggle is turned on and check “iCloud Passwords & Keychain” is enabled.
How to Create a Passkey
The steps to create a passkey vary from service to service, but generally speaking, you’ll need to find the passkey option in your account settings for the said app or service. Then just follow the on-screen instructions.
I’m using a Google account as an example below, to demonstrate exactly how to create and save a passkey on your iPhone, iPad, or Mac.
On your Apple device, open Safari or Chrome and visit myaccount.google.com . From the dashboard, select the “Security” tab.

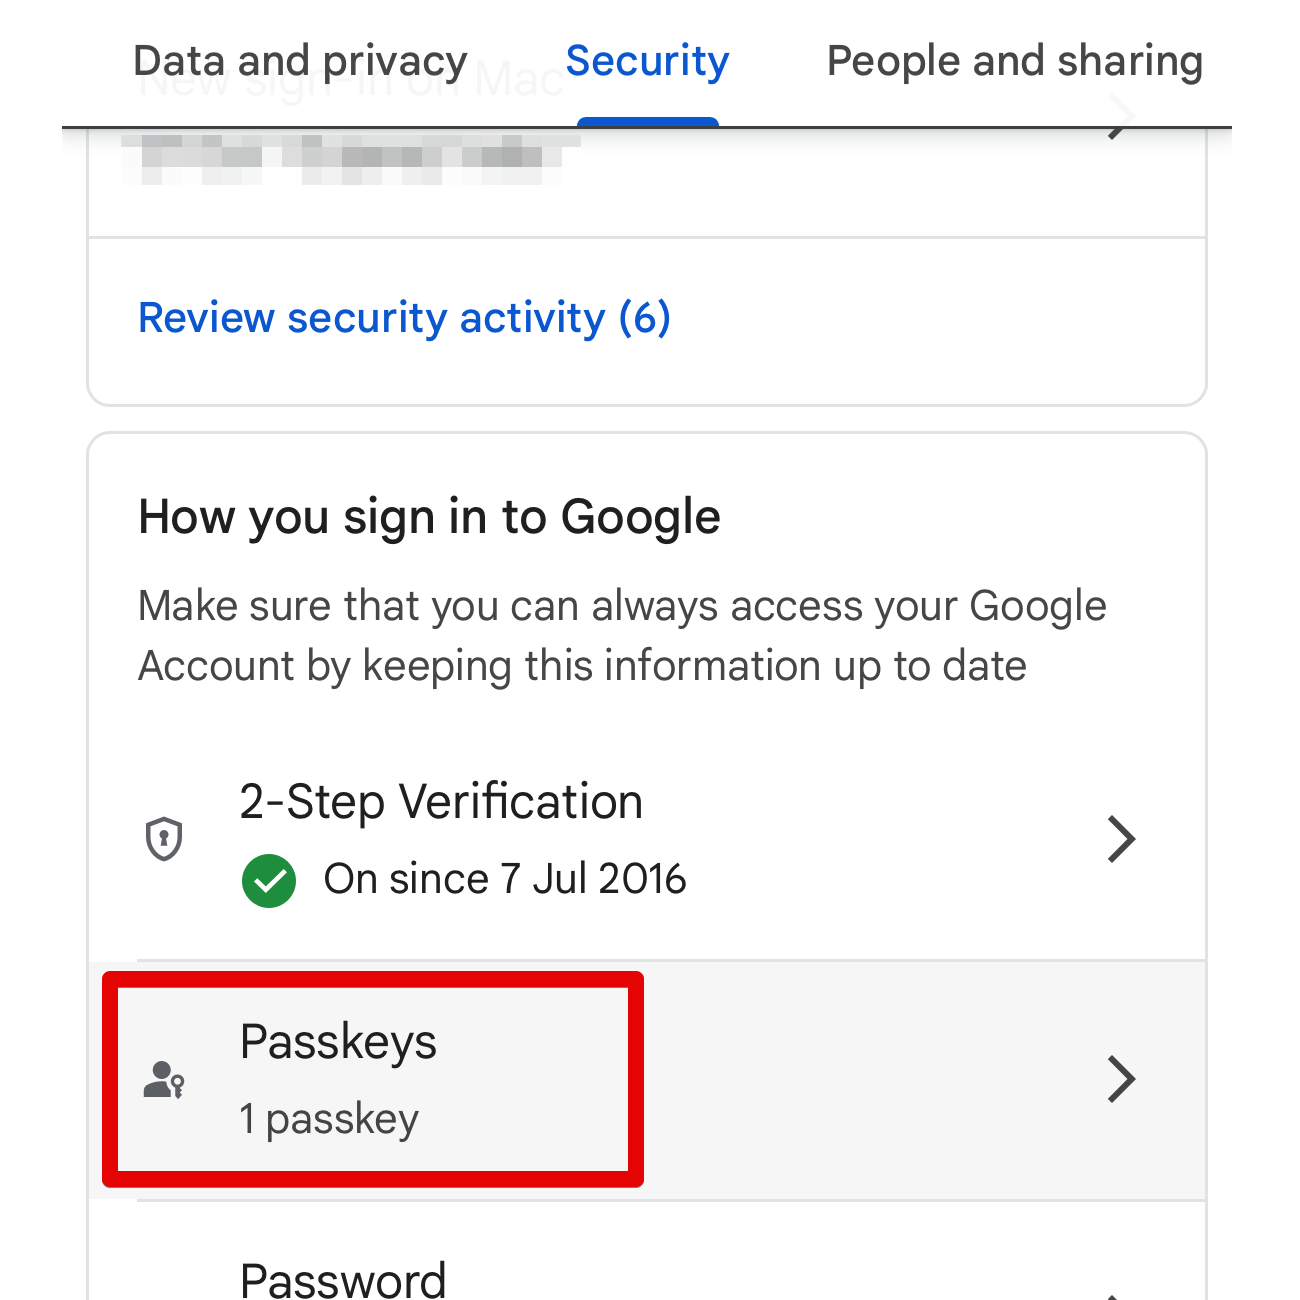
Under the “How You Sign In to Google” header, locate “Passkeys” and tap it. You might be asked to enter your account password to verify your identity here.
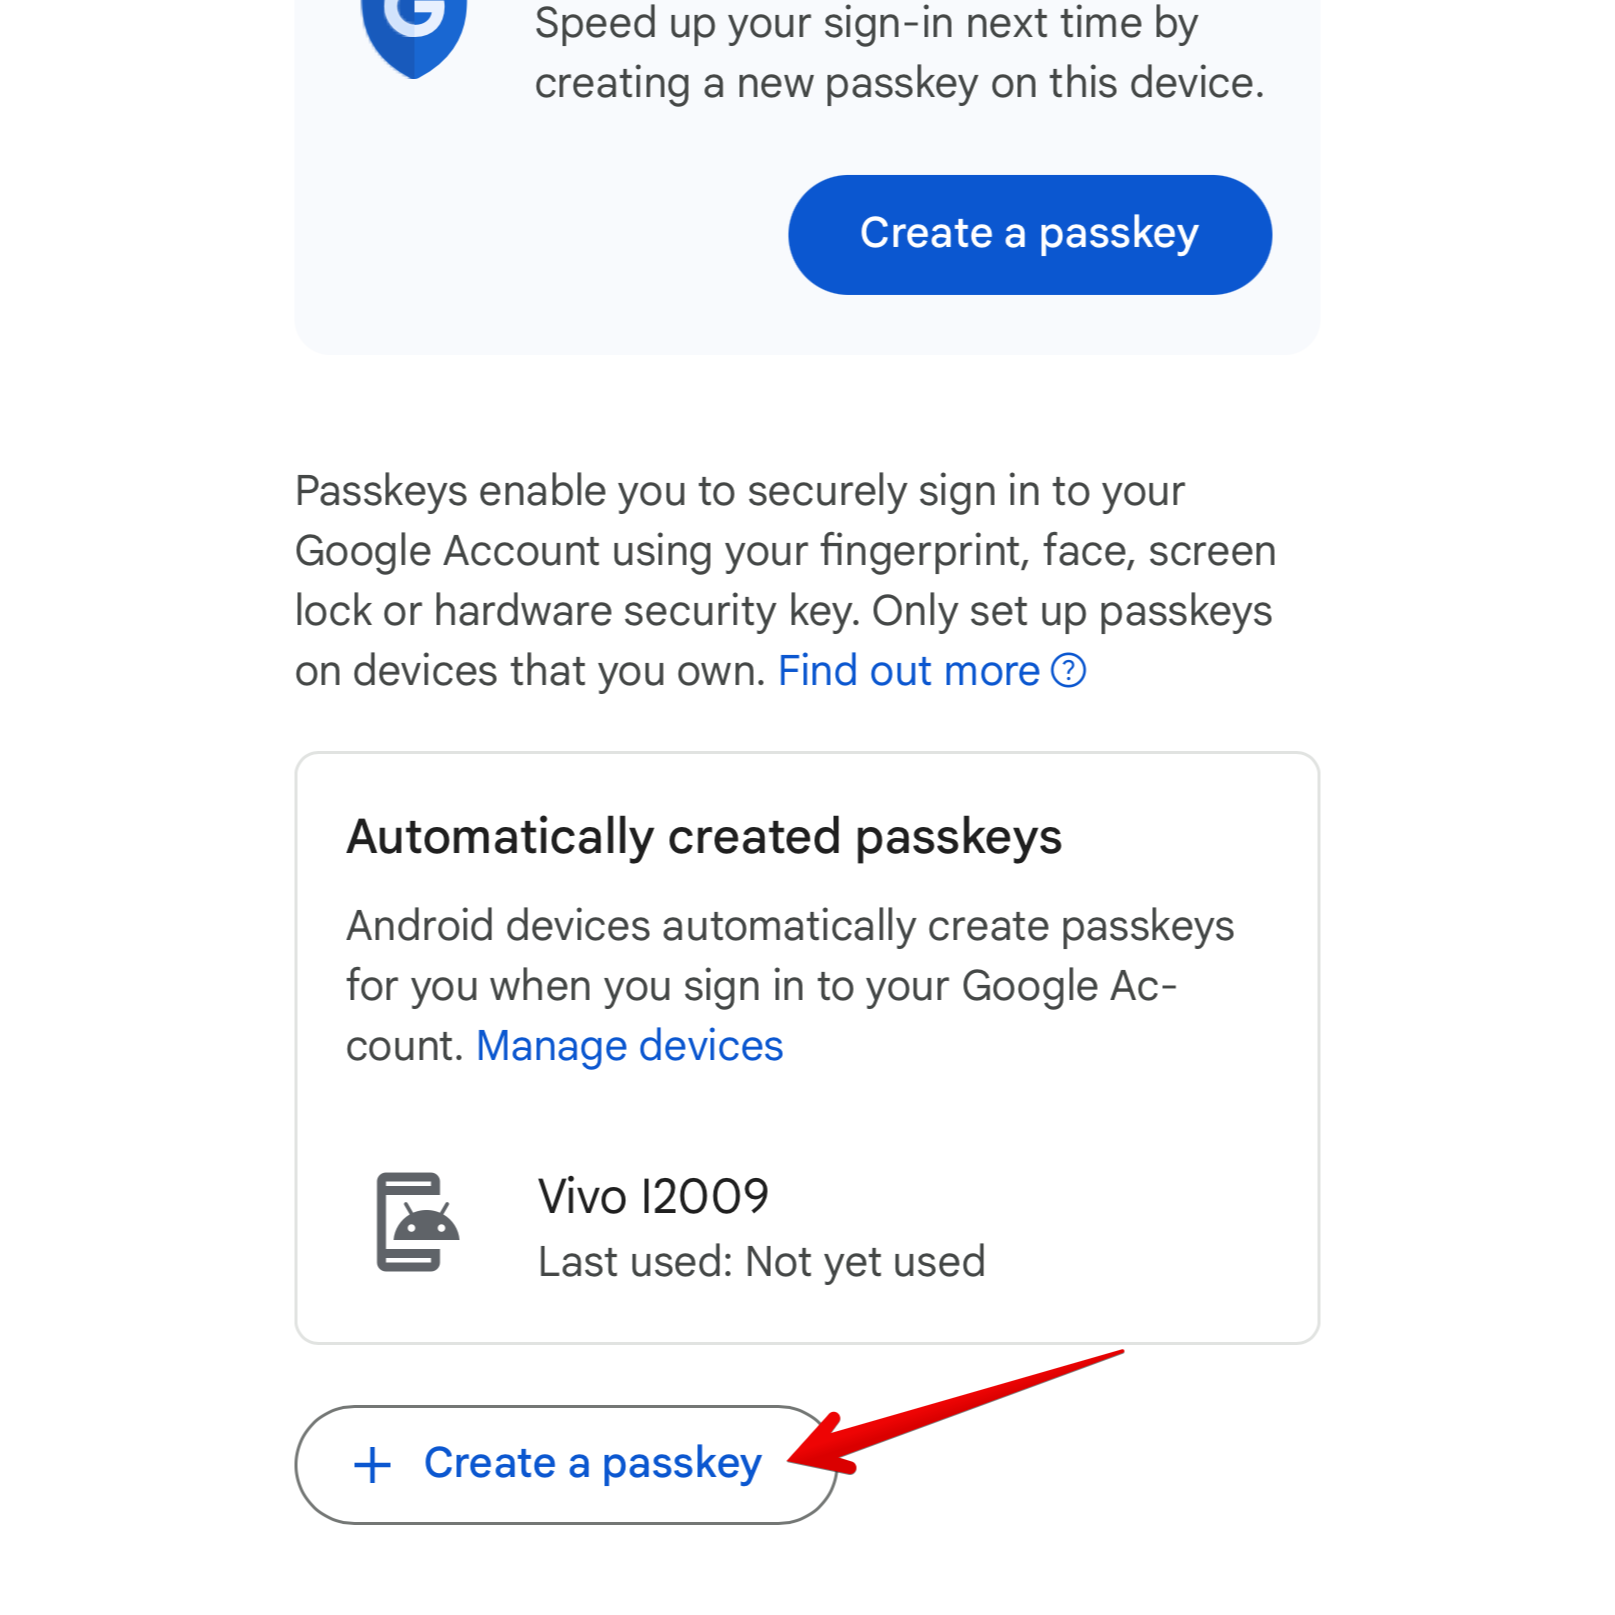
To generate a new passkey, tap the “Create a Passkey**”** button located at the bottom. Then tap “Continue” to proceed.
On the next screen, you’ll be prompted to save the passkey to iCloud Keychain. Tap “Continue” to authenticate yourself using Face ID or Touch ID. If you haven’t set up a biometric option, enter your passcode.

That’s it! You’ve successfully created and saved a passkey for your Google Account on your Apple device. You can now log in to your Google Account by simply using facial recognition, fingerprint recognition, or your passcode. You can also safely share your passkeys with your friends and family .
How to Sign In to Your Accounts with Passkeys
Now that you’ve created a passkey, it’s time to use it to sign in to your account. Since passkeys are synced to iCloud Keychain, they’re available across all the devices that are signed in to the same Apple ID.
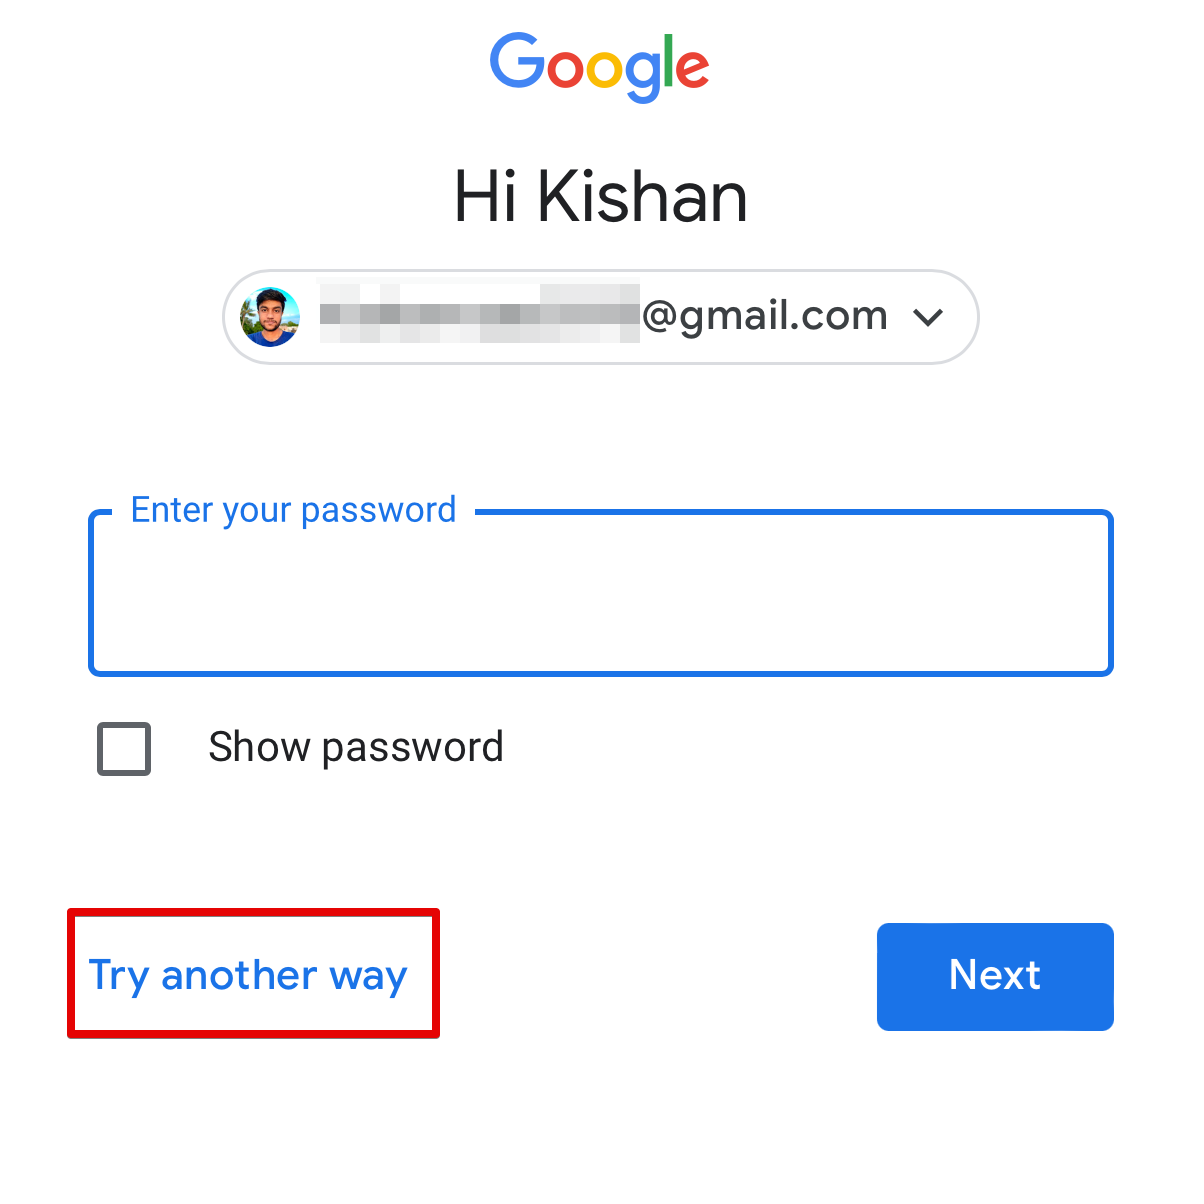
Go to the account login page of the website or app for which you’ve created the passkey. I’m using a Google account in my example again. Enter your email address or phone number and click “Next.” On the next screen, tap “Try Another Way.”
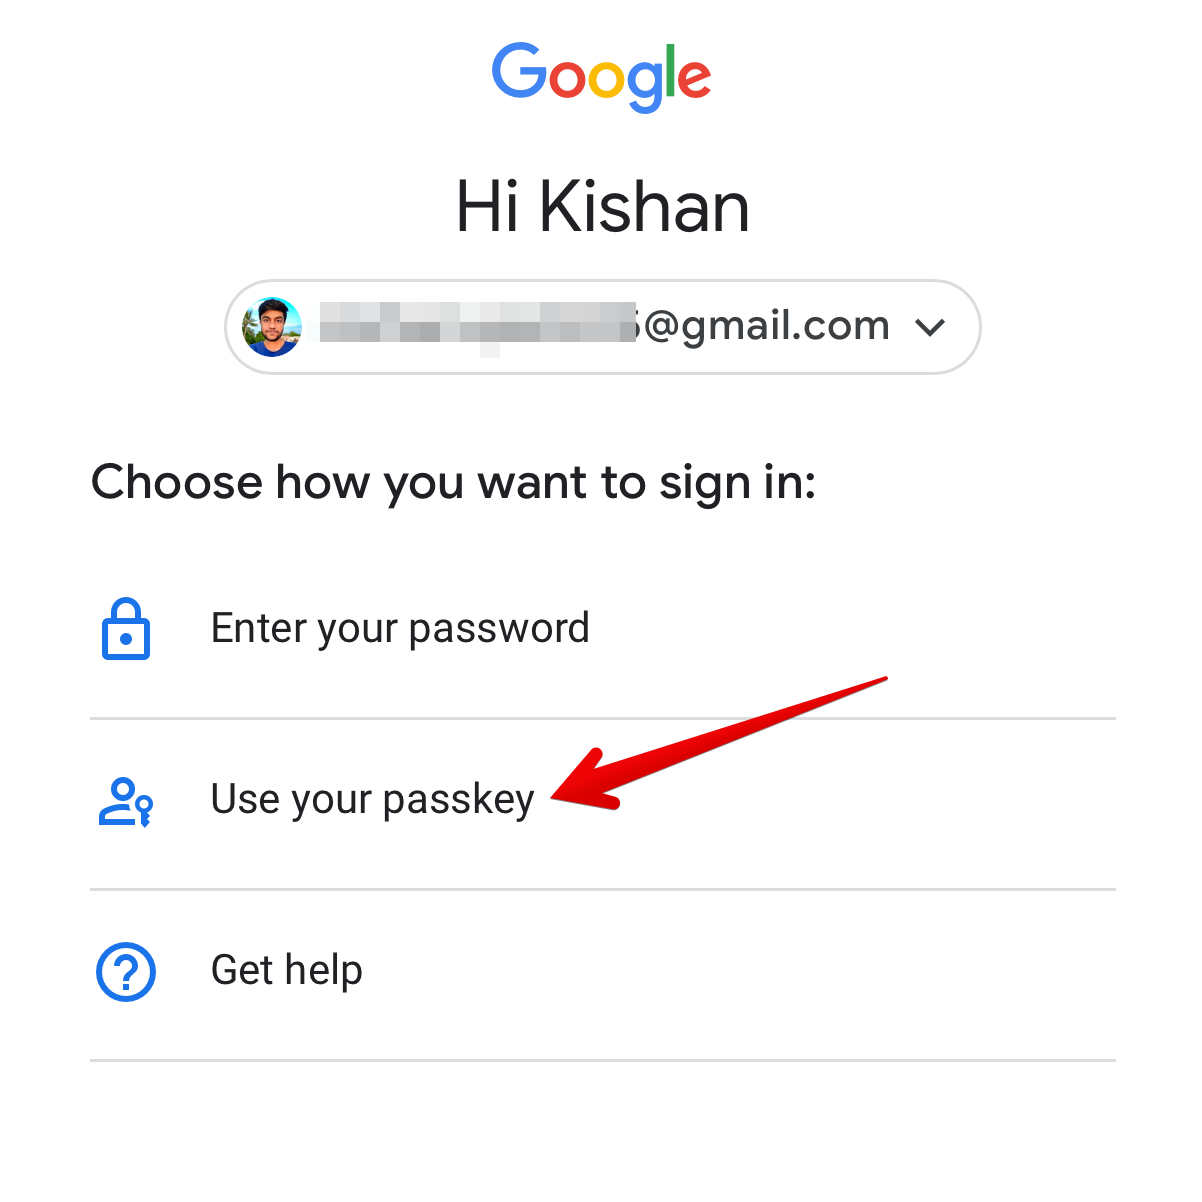
From the listed options, select “Use Your Passkey.”
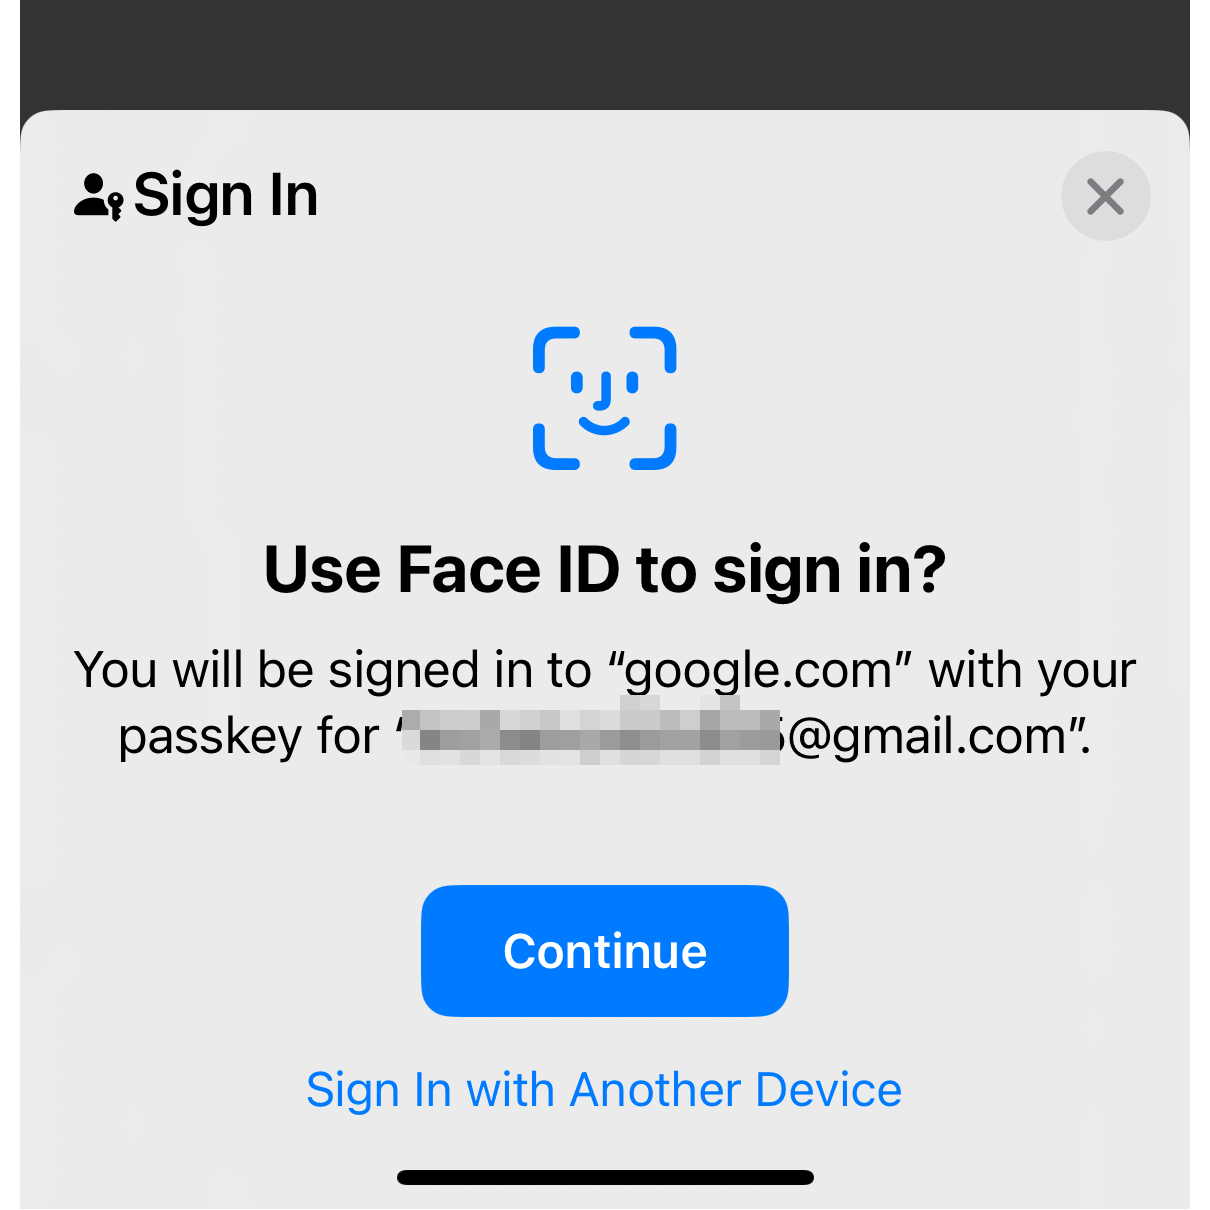
Tap “Continue.” Depending on which unlock method you’ve set up on your device, you’ll be asked to authenticate yourself with Face ID, Touch ID, or your passcode. After doing so, you’ll be automatically logged into your account.
How to Use Passkeys on a Different Device
If you’re on a device that’s not associated with your Apple ID, say you’re using a friend’s computer, you can still sign in to apps and websites using the passkeys stored on your iPhone or iPad. This requires scanning a QR code on your phone or tablet. Here’s how.
On the other device, go to the sign-in page and enter your username. Click next and choose the option to sign in with a passkey.
A pop-up box should appear on the screen asking you whether you would like to use a passkey from another device. Select the option to sign in from an iPhone, iPad, or Android device and click “Continue.”
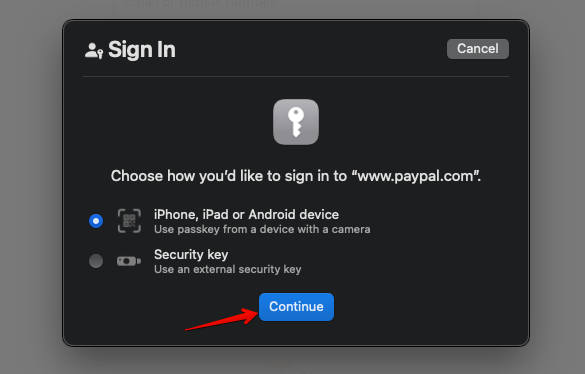
You should see a QR code appear on the screen.
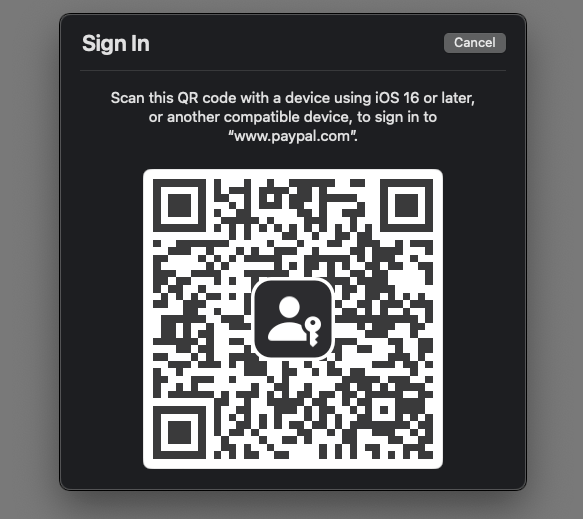
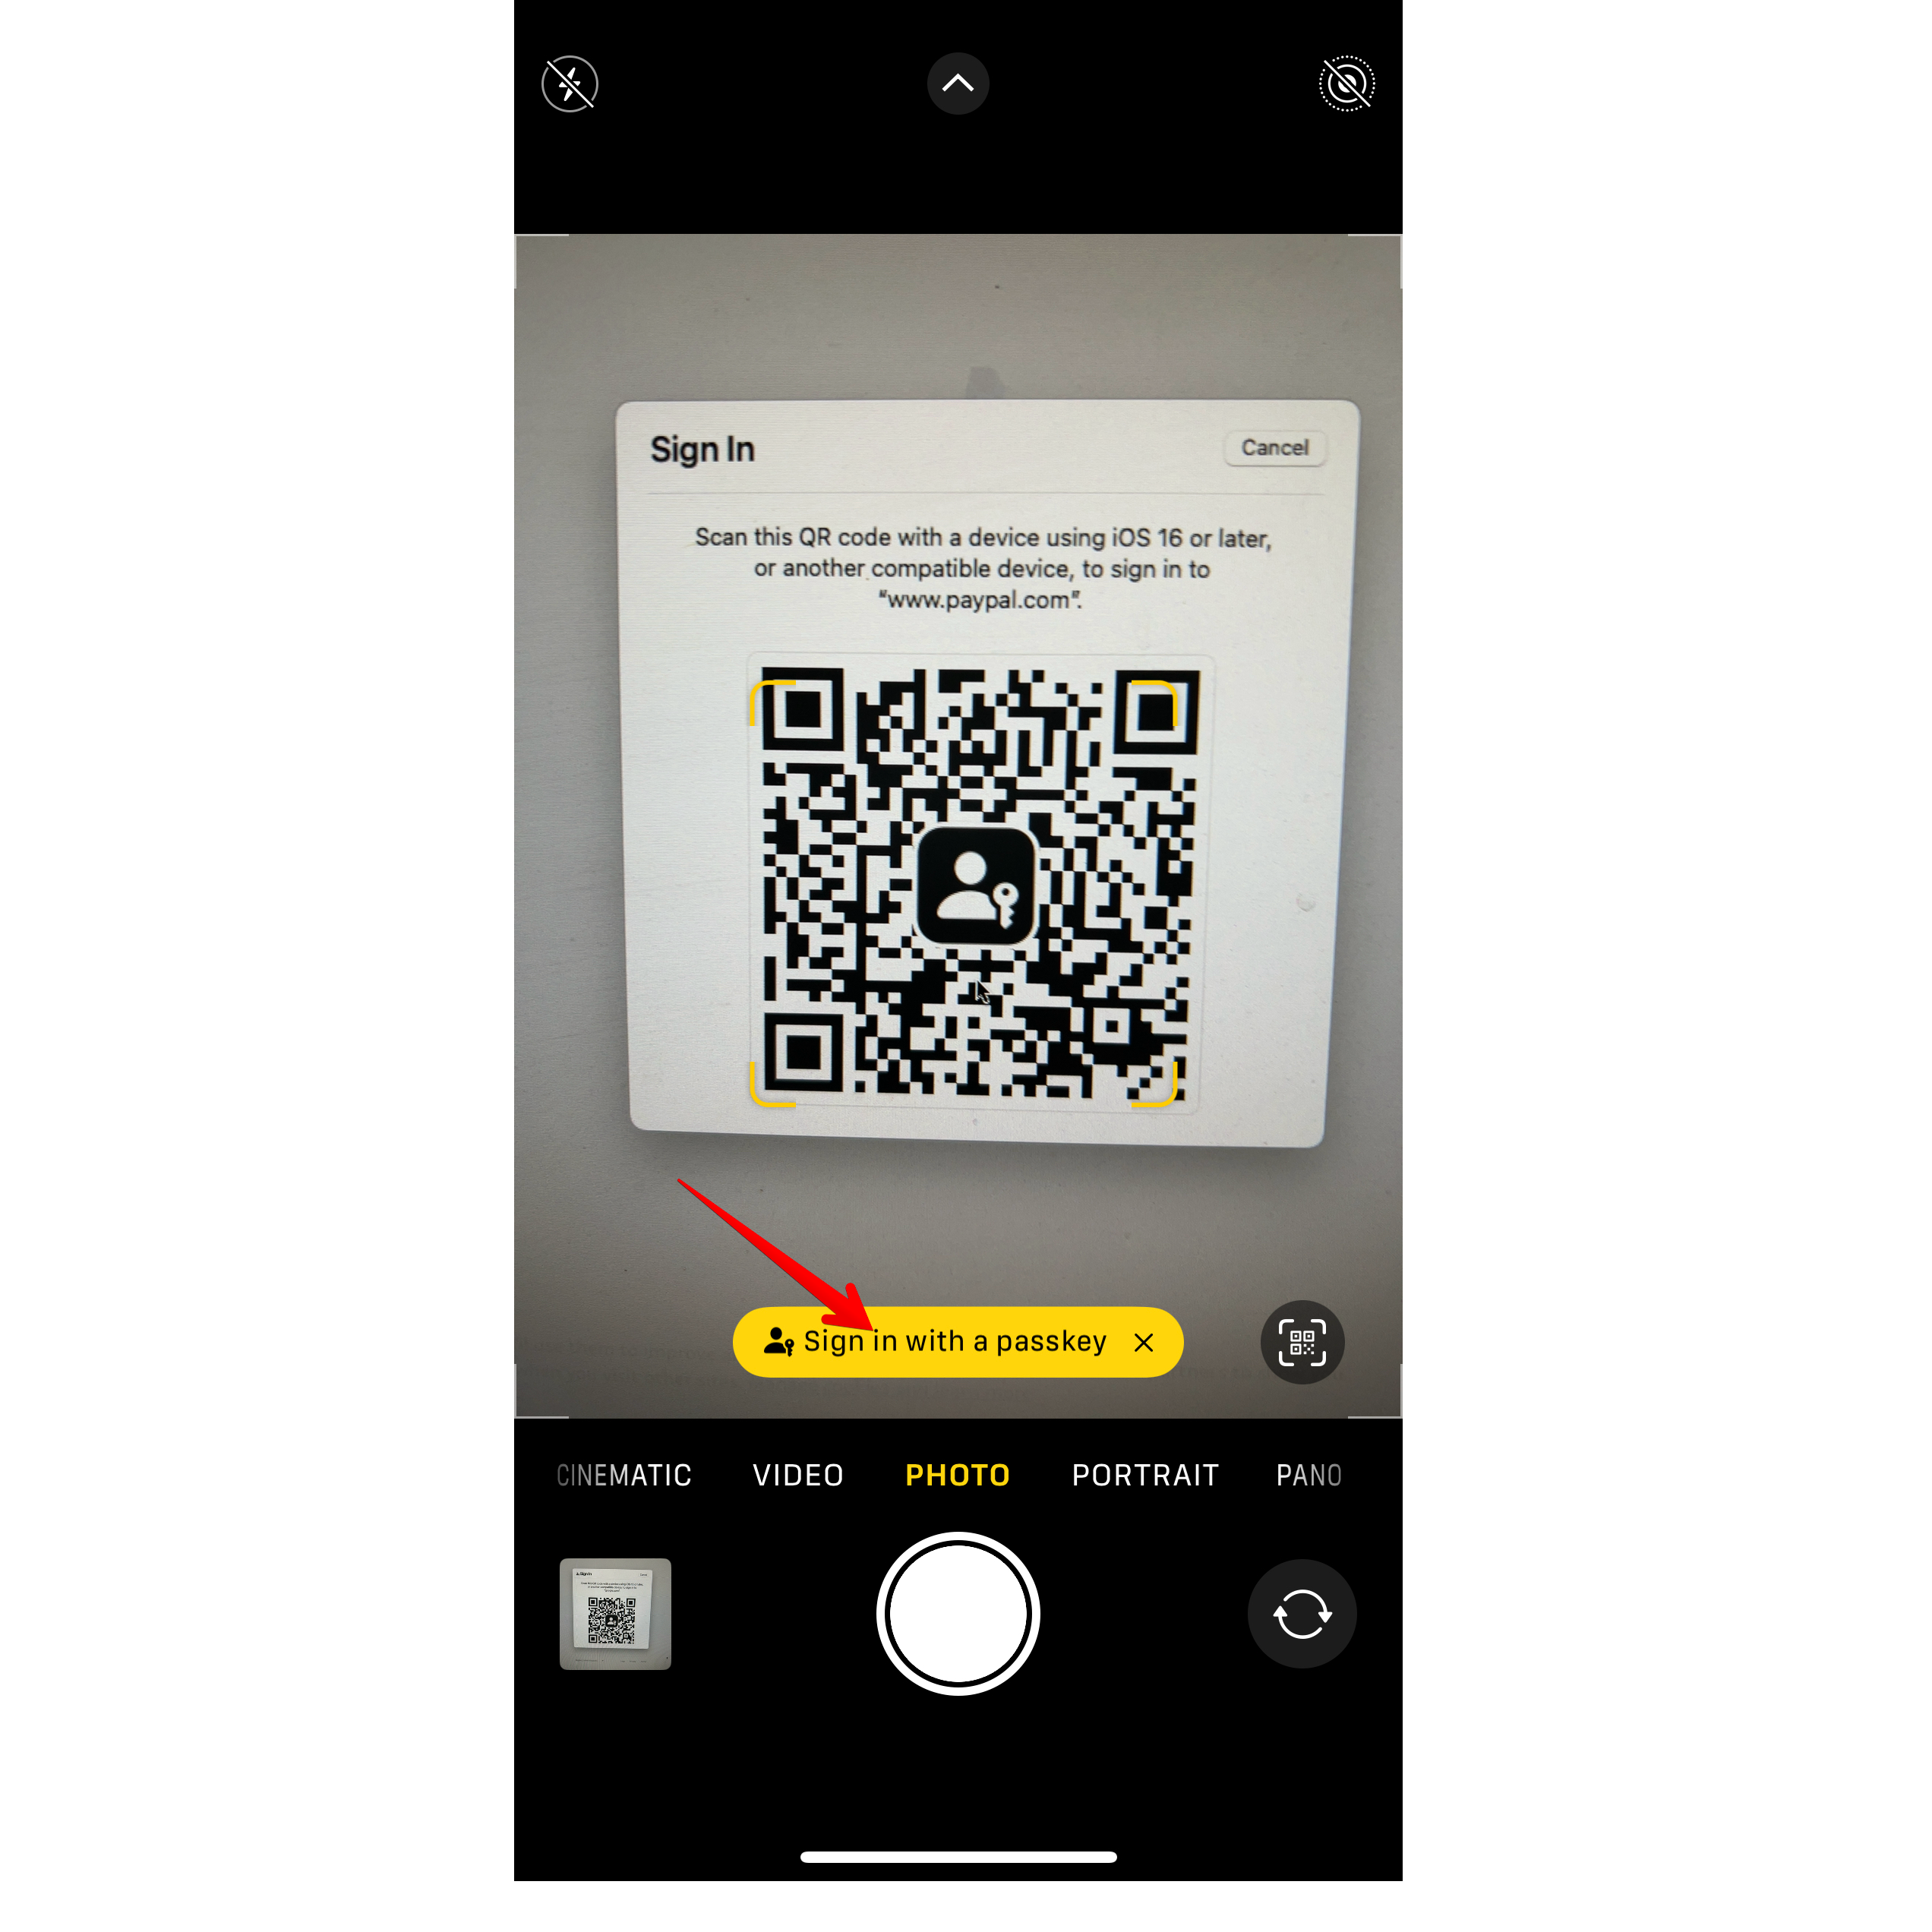
Now, open the camera app on your iPhone or iPad and simply point it to the QR code. (Don’t click the shutter button.) Then tap the “Sign In with a Passkey” button that pops up on the screen. Make sure Bluetooth is enabled on both devices and they’re close to each other.
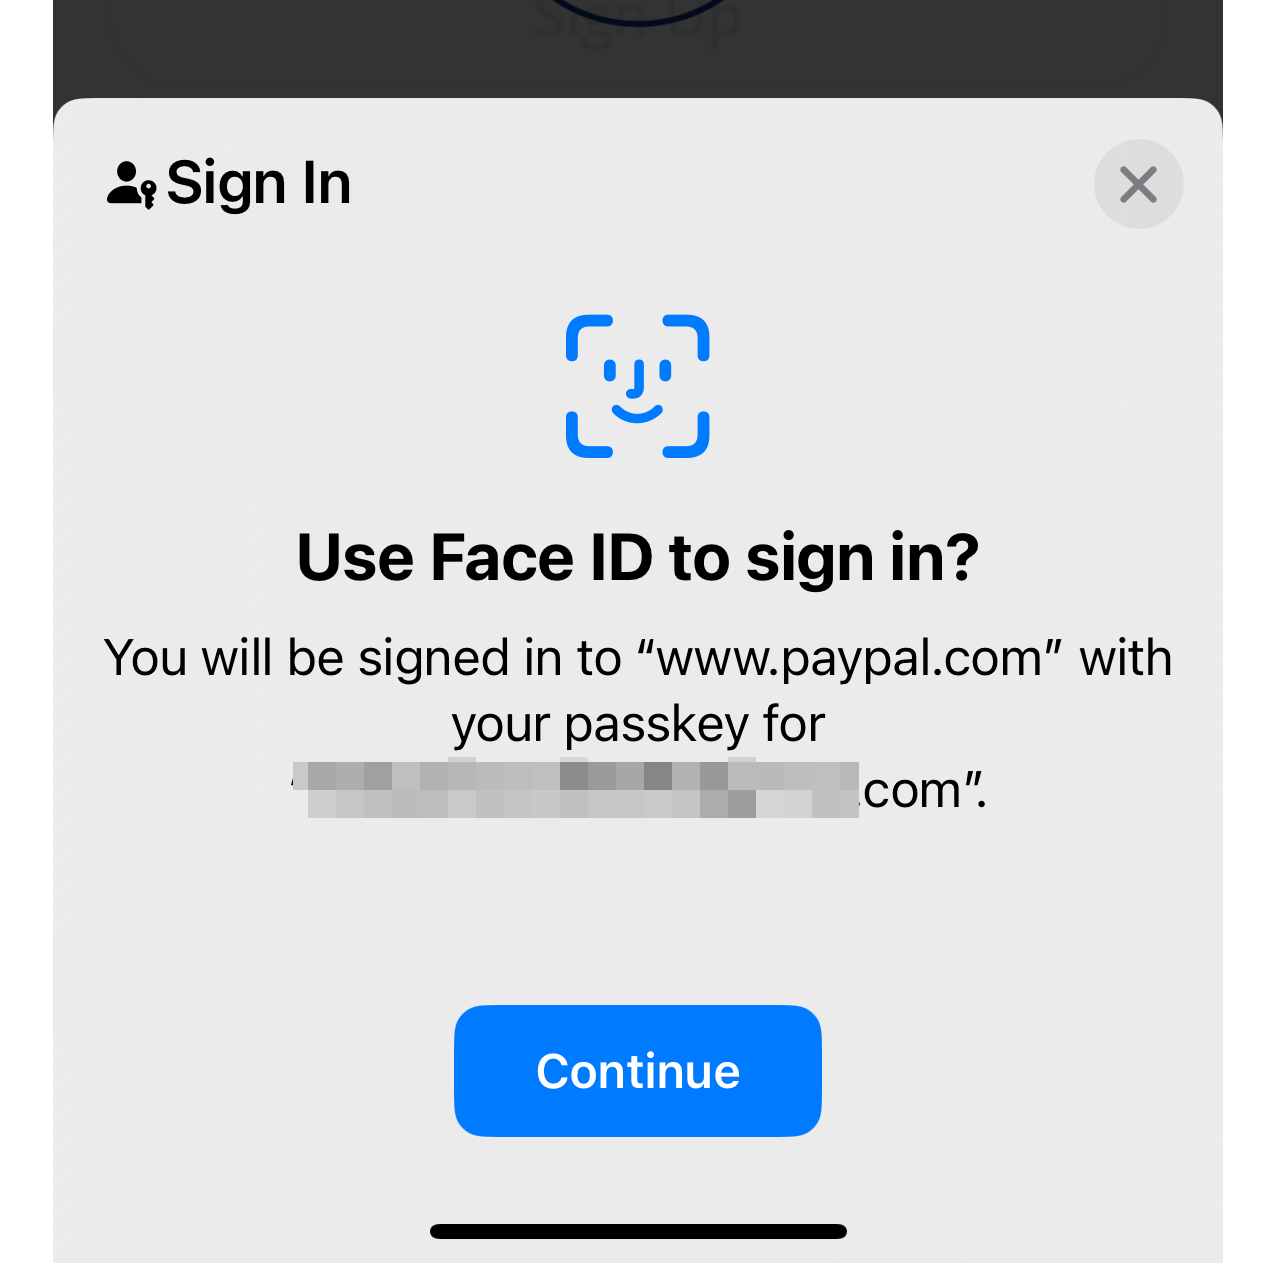
Tap “Continue” to authenticate yourself with Face ID, Touch ID, or your passcode to complete the sign-in process.
Why You Should Be Using Passkeys Whenever Possible
Switching to passkeys can greatly enhance your account security. Passkeys trump passwords in almost all regards, including speed, convenience, and security. You won’t have a bunch of bad password habits you need to break with passkeys, and you don’t have to remember anything.
A website or app can only access your passkey when you authenticate the request using your device unlock method—fingerprint scanner, facial recognition, or PIN. So, in theory, nobody should be able to access your passkey unless they have physical access to your device.
Another big plus is that passkeys are phishing-resistant by design. Passkeys only work on the sites and apps they were created for. This makes it tough for phishers to trick you into authenticating on a fake website. Of course, no security standard or authentication method is foolproof. For all we know, bad actors might still be able to find loopholes in passkeys. But for average users, passkeys represent a big step up over plain old passwords, while making the log-in process even effortless.
Also read:
- [New] 17 Best Lights and Lighting Equipment for YouTube
- [New] Making a Mark on YouTube Proven Techniques From Creator Studio Experts
- [Updated] Complete Immersive Camera Review
- [Updated] Syncopated Sounds Discovering Crossfades for 2024
- Charting Success Top 15 Investment Educational Videos for 2024
- Creative Channel Themes Get Them for Free for 2024
- Maximize Your Marketing Metrics Top 8 Apps for Facebook Like Boost for 2024
- Sourav Joshi's Financial Acumen in the World of YouTube Earnings for 2024
- Step-by-Step Guide: Disabling Your iPhone's Lock Screen Security
- Step-by-Step Tutorial: Connecting with Google Gemini AI via iOS Devices
- Stuck on Apple Logo? Troubleshoot Your Apple Watch with Effective Solutions
- The Essential Guide: When Are Bluetooth Adapters Necessary for Your Lightning Headphones?
- The Future Is Now: Anticipating Artificial Intelligence Upgrades for Apple Devices This Fall
- The Ultimate Guide to Troubleshoot Non-Syncing of iPhones Calendar with Microsoft Outlook
- Top 6 Practical Applications of iPhone's Visual Lookup Tool
- Title: Secure Your Apple Ecosystem: The Complete Tutorial for Activating Passkeys Across iPhone, iPad & Mac
- Author: Daniel
- Created at : 2025-02-18 18:22:43
- Updated at : 2025-02-19 19:18:19
- Link: https://os-tips.techidaily.com/secure-your-apple-ecosystem-the-complete-tutorial-for-activating-passkeys-across-iphone-ipad-and-mac/
- License: This work is licensed under CC BY-NC-SA 4.0.