Simple Steps to Move Your iPhone Pictures Onto Your Computer

Simple Steps to Move Your iPhone Pictures Onto Your Computer
Quick Links
- Use File Explorer or Windows Explorer
- Import Photos With Windows Photos (or Other Applications)
- Sync Your Photos With iCloud Photo Library (or Other Services)
Key Takeaways
To transfer pictures from your iPhone to a Window PC, plug your iPhone into the PC with a USB cable and tap either “Trust” or “Allow” to enable photo transfers. Then open your iPhone in File Explorer to transfer videos and images.
You don’t need any special software to transfer photos and videos from an iPhone to a Windows PC. You don’t even need iTunes. All you need is the Lightning-to-USB cable you use for charging.
In fact, Apple’s iTunes software doesn’t even have a built-in way to copy photos from your iPhone to your PC. It does have a photo sync feature, but that’s just for copying photos from your PC to your iPhone.
Use File Explorer or Windows Explorer
Connect your iPhone or iPad to your computer using the included Lightning-to-USB or USB-C cable to get started. This is the same cable you use for charging your phone.
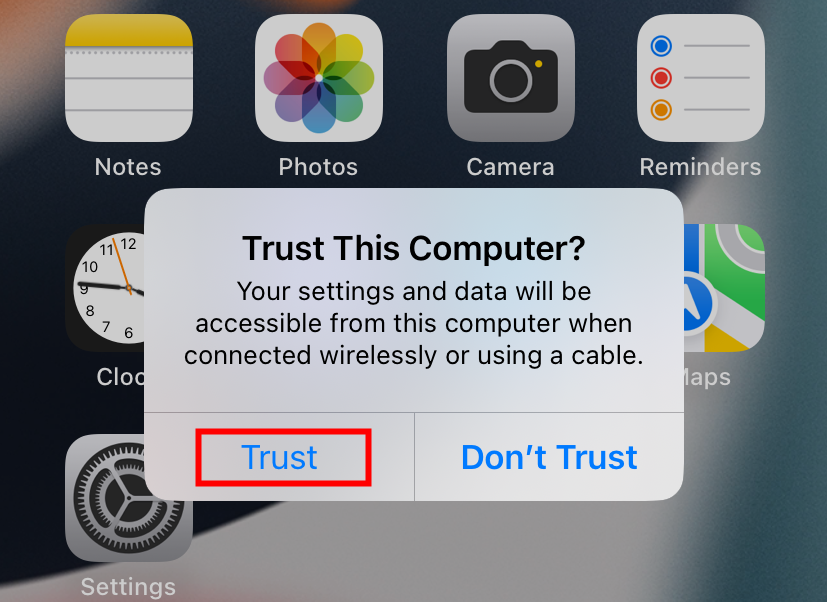
The first time you connect it to your computer, you’ll see a popup asking you to trust your computer (if you have iTunes installed) or allow access to your photos and videos (if you don’t have iTunes installed). Tap “Trust” or “Allow” to give your computer access to your photos. You may have to unlock your iPhone before you see this popup.
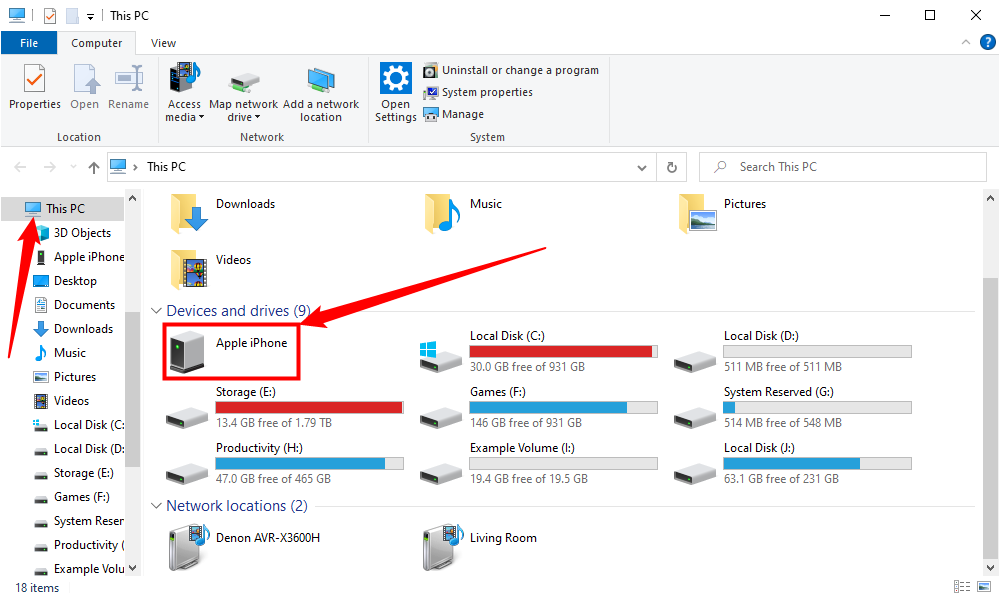
Your iPhone appears as a new device under “This PC” in File Explorer on Windows 10 or Windows 11. Head here and double-click it.
If you don’t see the iPhone under This PC or Computer, unplug the iPhone, plug it back in, and ensure it’s unlocked.
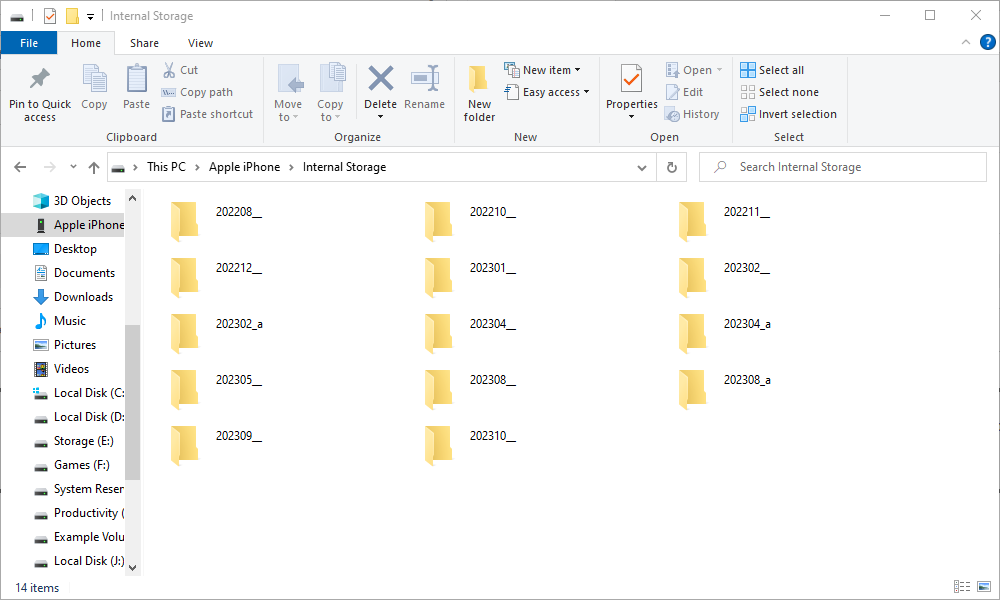
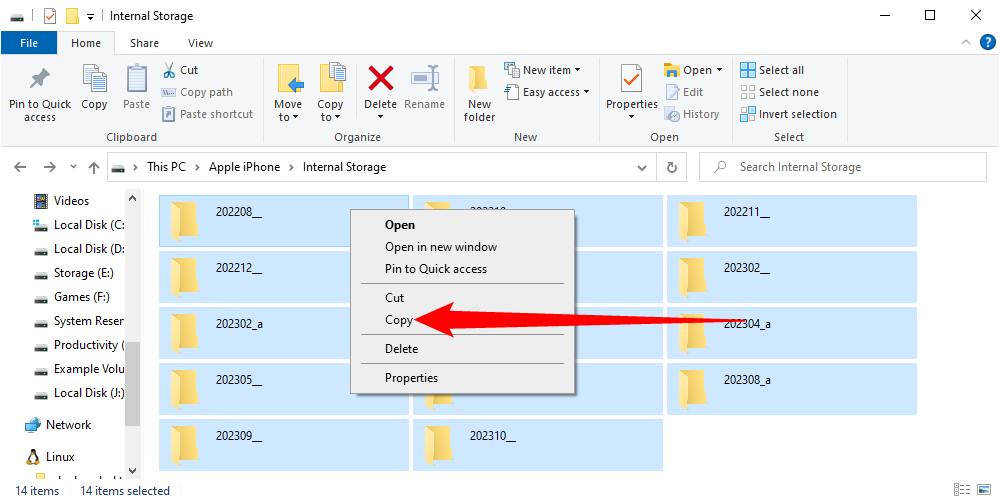
On modern versions of iOS you’ll see a number of folders with numerical names that contain your photos.
On older versions of iOS you’ll see a folder named DCIM, and your photos and videos will be stored in a 100APPLE folder. If you have lots of photos and videos, you’ll see additional folders named 101APPLE, 102APPLE, and so on. If you use iCloud to store photos, you’ll also see folders named 100Cloud, 101Cloud, and so on.
You’ll see your photos as .JPG files or .HEIC files, videos as .MOV files, and screenshots as .PNG files. You can double-click them to view them right from your iPhone. You can also copy them to your PC using either drag-and-drop or copy-and-paste.
If you delete an item in the DCIM folder, it’s removed from your iPhone’s storage.
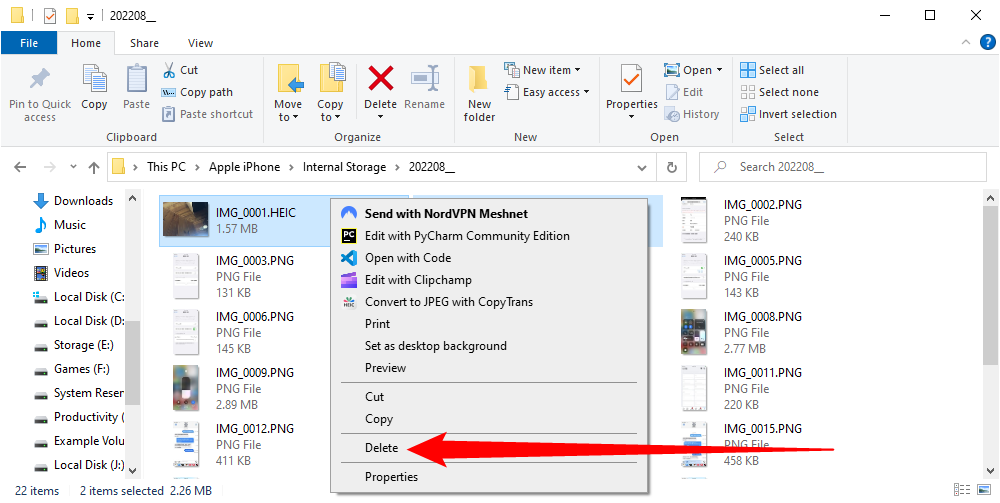
To import everything from your iPhone, you could just copy-and-paste or drag-and-drop the 100APPLE folder (and any other folders) inside the DCIM folder. Or, you could just grab the whole DCIM folder if you want. Just make sure to copy instead of move the items, if you want them to remain on your phone.
If you see files with the .HIEC file extension, that indicates your iPhone is taking photos using the HEIF image format . This is the default setting as of iOS 11 and later, but you need to install the HEIF image extension to view these files on Windows .
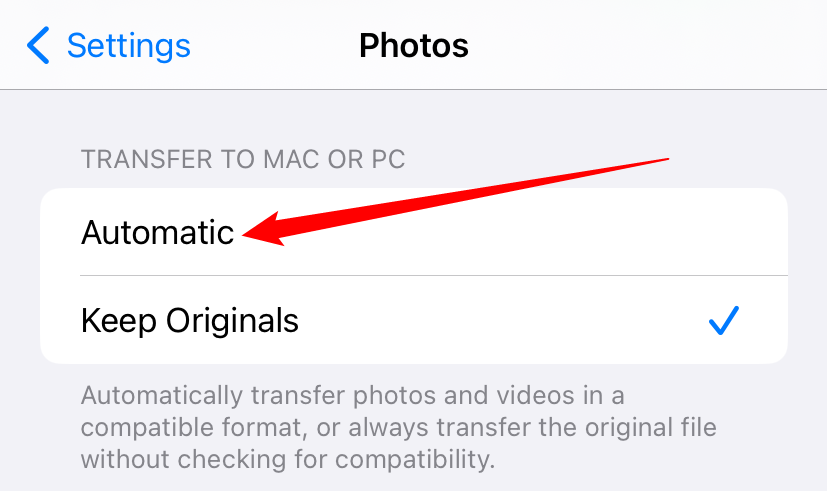
However, you don’t have to disable HEIF on your iPhone to make these photos more compatible. On your iPhone, head to Settings > Photos, scroll down, and then tap “Automatic” under Transfer to Mac or PC. Your iPhone automatically converts the photos to .JPEG files when you import them to a PC.
If you select “Keep Originals” instead, your iPhone will give you the original .HEIC files.
Import Photos With Windows Photos (or Other Applications)
Any application that can import photos from a digital camera or USB device can also import photos from an iPhone or iPad. The iPhone exposes media folders, so it looks just like any other digital camera to software on your PC. As when using the Windows file manager, you just have to connect it via a Lightning-to-USB or USB-C cable (depending on your iPhone model) and tap “Trust” on your phone.
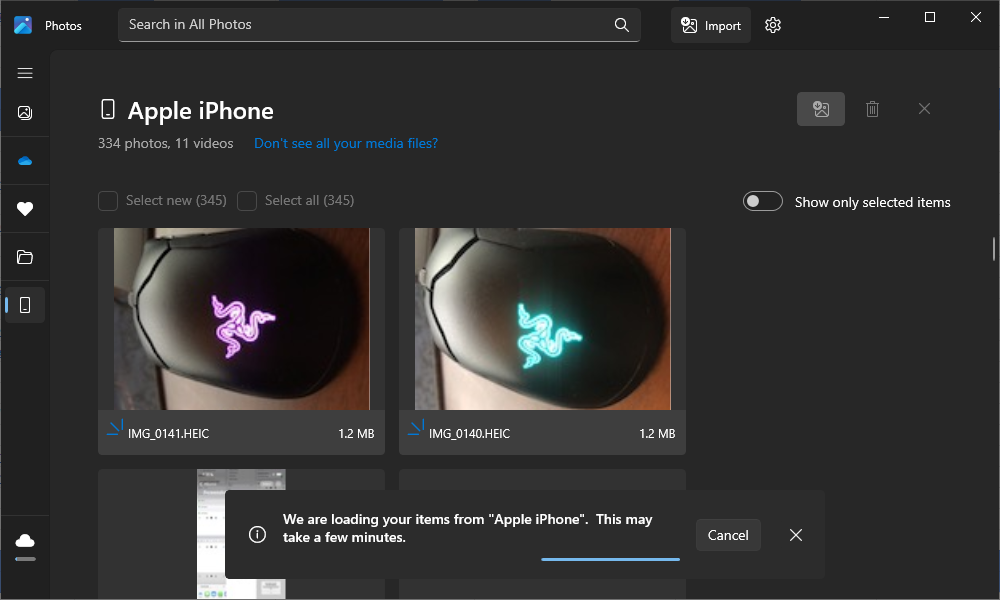
For example, you can open the Photos application included with Windows 10 or Windows 11, and then click the “Import” button on the toolbar to get a slick import experience. Photos you import in this way are saved in your Pictures folder.
Any other application that offers an “Import From Camera” or “Import From USB” function should work with your iPhone, too. Many other image management and photography programs offer this feature.
Sync Your Photos With iCloud Photo Library (or Other Services)
If you don’t want to connect your iPhone to your PC via a cable, you can also use online photo synchronization services. These won’t just upload photos from your iPhone to the cloud — they’ll also download those photos from the cloud to your PC. You’ll end up with a copy stored online and a copy stored on your PC.
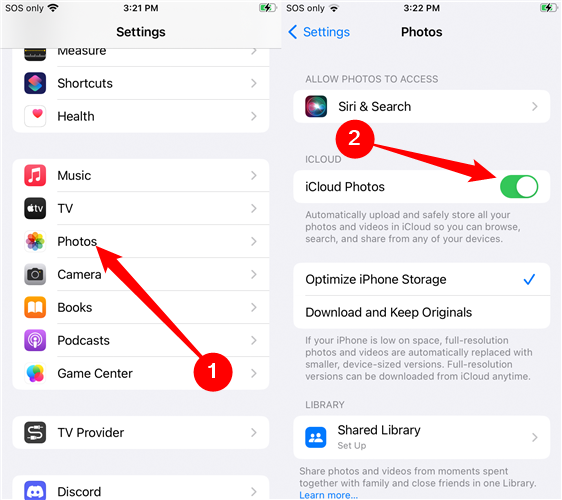
For example, you can enable iCloud Photo Library on your iPhone by heading to Settings > Photos and activating “iCloud Photo Library” if it isn’t already enabled. Your iPhone will then automatically upload your photos to your Apple iCloud account.
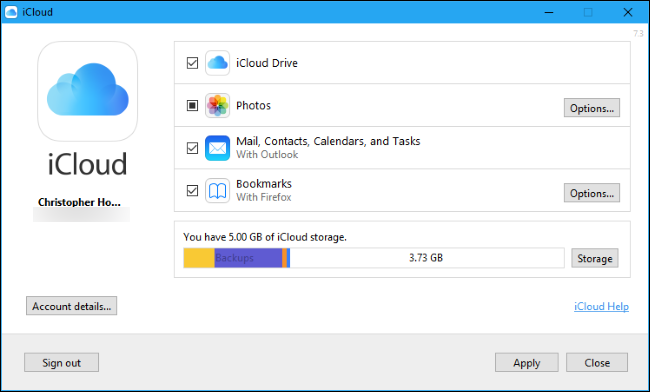
You can then install iCloud for Windows , sign in with your Apple ID, and enable the “Photos” feature in the iCloud control panel. Click the “Options” button to control where photos are stored on your PC and adjust other settings.
Photos that you take are automatically uploaded to your iCloud Photo Library, and then the iCloud software automatically downloads a copy of them to your PC.
This isn’t the only application you can use for synchronizing photos to your PC. The Dropbox , Google Photos , and Microsoft OneDrive apps for iPhone all offer automatic photo-upload features, and you can use the Dropbox , Google Backup and Sync , and OneDrive tools for Windows to automatically download those photos to your PC.
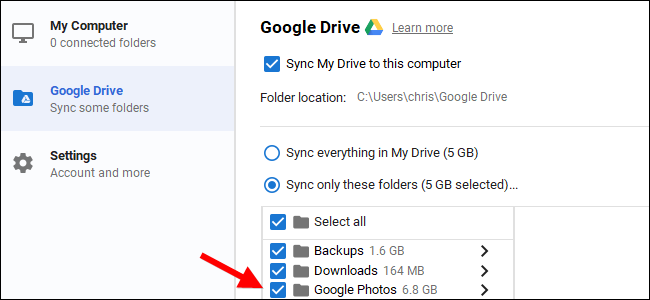
Just keep in mind that with these services, you’re actually syncing those folders. So, if you delete something from a synced folder on your PC, it is also deleted on your phone.
Also read:
- [Updated] The Essentials of Firefox's PIP Functionality
- [Updated] Top Portable Audio Choices Decoded
- 進行成功的 Windows 11 安裝: 常見問題及解決之道
- Best Camcorder Tech for Shooting Sports
- Discover the Best 13 Free DVD Players for Windows 11 Users - Complete Review and Comparisons
- Expert Advice on Purging Your iPhone: Efficient Strategies From Stellar Professionals
- Step-by-Step for Beginner 3D LUT Masters
- The Most Useful Tips for Pokemon Go Ultra League On Oppo Reno 11 Pro 5G | Dr.fone
- Troubleshooting and Resolving Quieter Than Usual AirPod Performance: Expert Tips & Tricks
- Ultimate Compact Power Solution Reviewed: Affordable Apple Road Warrior Essentials with the Mophie Multi-Charger
- Ultimate Guide: Shrinking Video Files on iPhone for Easy Sharing
- Ultimate Selection of Premium iPad Supports : Enhance Your Tablet Experience
- Ultimate Selection: The Finest iPhone SE Shields for 2지날년
- Understanding Your iPhone's Message Colors: Why Do Some iMessages Appear as Green While Others Are Blue?
- Why Your WhatsApp Live Location is Not Updating and How to Fix on your Tecno Spark 20 Pro | Dr.fone
- Title: Simple Steps to Move Your iPhone Pictures Onto Your Computer
- Author: Daniel
- Created at : 2025-02-13 20:44:38
- Updated at : 2025-02-19 22:49:26
- Link: https://os-tips.techidaily.com/simple-steps-to-move-your-iphone-pictures-onto-your-computer/
- License: This work is licensed under CC BY-NC-SA 4.0.