Step-by-Step Guide: Syncing and Editing iPhone Contacts via Windows PC Using DearMob

Step-by-Step Guide: Syncing and Editing iPhone Contacts via Windows PC Using DearMob
Disclaimer: This post includes affiliate links
If you click on a link and make a purchase, I may receive a commission at no extra cost to you.
How to Manage iPhone Contacts on PC
DearMob iPhone Manager , an easy-to-use iOS and iPadOS manager, empowers the iPhone users to organize the contact items without limits. You can export the iPhone contacts to your Windows computer, or import the file on Windows to your iPhone; you can add new contacts, edit the existed contacts, and even delete the unwanted contacts; furthermore, you can sync the contacts on iPhone to your Windows contact folder, back them up and restore when necessary, and merge the same contacts into just one.
Create and Manage Groups of Contacts
![]() Tips:
Tips:
- All the contacts stay in the iPhone entry. Adding new contact on a specific group will also add it to the iPhone entry. You can add one contact to multiple groups. For instance, a contact may belong to the Friends Group and the Running Club group simultaneously.
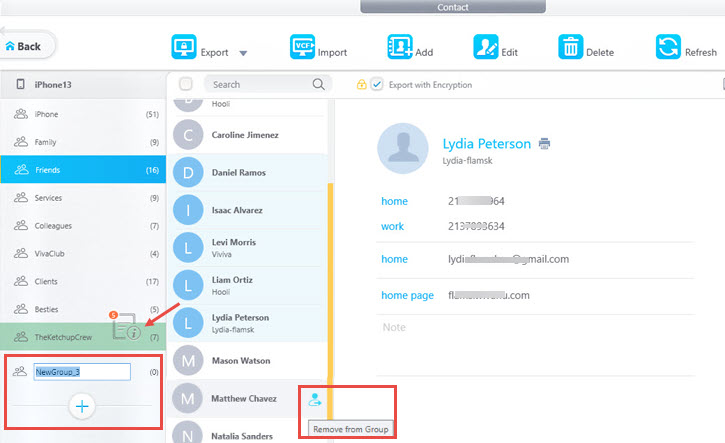
Create New Groups: Click the Plus button at the left bar to create a group.
Move Contact among Groups: Select one or multiple contacts and drag-and-drop to a desired group.
Remove Contact from Group: Hover to a Contact and click the icon to Remove from Group. Note that removing the contact from group will not deleting it from iPhone. It still stays in the iPhone entry.
Create New Contact Inside a Group: Select a group and click the Add button to create a new contact, enter info and hit the Save button, then Click Sync.
![]() Important Note:
Important Note:
Managing Contact Groups on iOS 15 and Lower
For iPhone 7/7Plus/SE first-gen and older models, Apple dropped the support for iOS 16 upgrading. Still, you can use DearMob iPhone Manager to enjoy part of the new grouping features, including:
- Move Contact among existing Groups
- Remove Contact from existing Group
- Create New Contact Inside an existing Group
To create new groups, you can go to icloud.com > Contacts, and click the Plus icon; or use the Contact app on Mac to create groups and sync it to iPhone.
Export Contacts from iPhone to Windows Computer
![]() Tips:
Tips:
- Please make sure that the iCloud Contact is off, or DearMob cannot access your iPhone contact data.
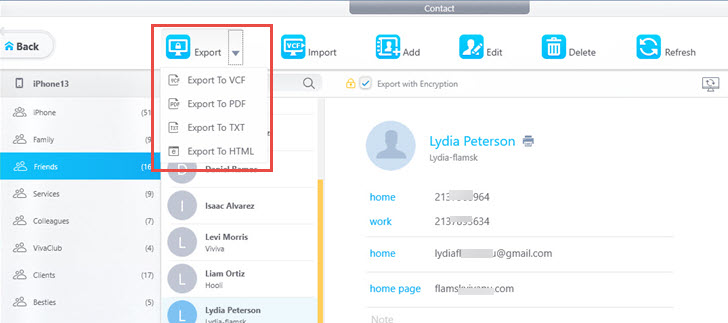
1. Choose the contact you want to export.
2. Click Export to download the contact to your local computer.
![]() Tips:
Tips:
- Supported output formats including: VCF, PDF, TXT and HTML.
Import Contacts from Windows Computer to iPhone
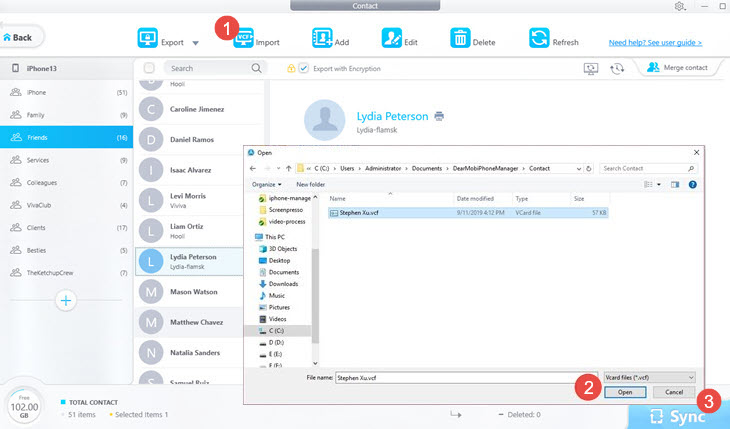
1. Click the Import button.
2. Find the contact file(s) with .vcf format on your computer, and Open.
3. Hit Sync button to transfer added contacts to your iPhone.
![]() Tips:
Tips:
- Only .vcf format file supported.
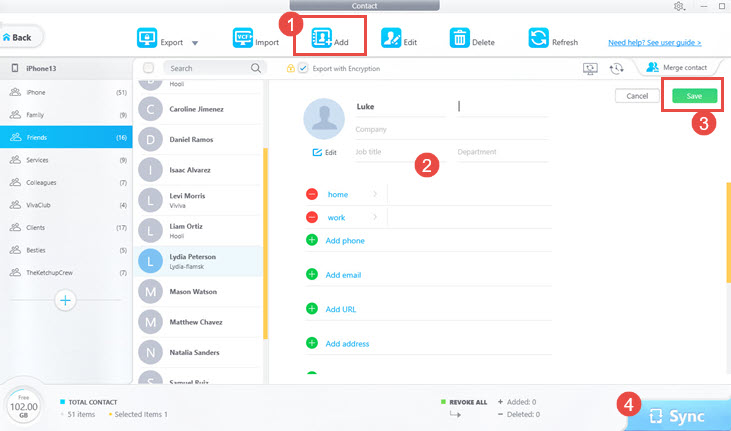
Create or Add New Contacts on iPhone
1. Click Add to create a new contact.
2. Input information like: First Name, Last Name, Add Phone, etc. and Save it.
3. Hit Sync button to transfer added contacts to your iPhone.
Edit Contacts on iPhone
1. Select one contact, and click Edit.
2. Edit the information like: First Name, Last Name, Company, Job Title, Department, Add Phone, Add Email, etc. and Save it.
![]() Tips:
Tips:
- You can click Edit icon to undo editing.
3. Hit Sync button to transfer edited contact to your iPhone.
Delete Contacts on iPhone
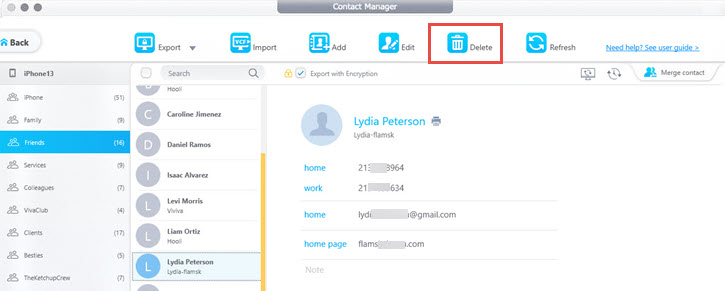
1. Select the contact that you want to delete, and click Delete.
![]() Tips:
Tips:
- To undo deleting before hitting the Sync button, you can click the grey Del button on the contact card, or the Cancel button on the bottom left corner.
- To select multiple contacts, use Ctrl-click or Shift-click.
- To select all the contacts, press Ctrl+A.
2. Hit Sync button to synchronize the deletion to your iPhone.
Back Up & Restore iPhone Contacts
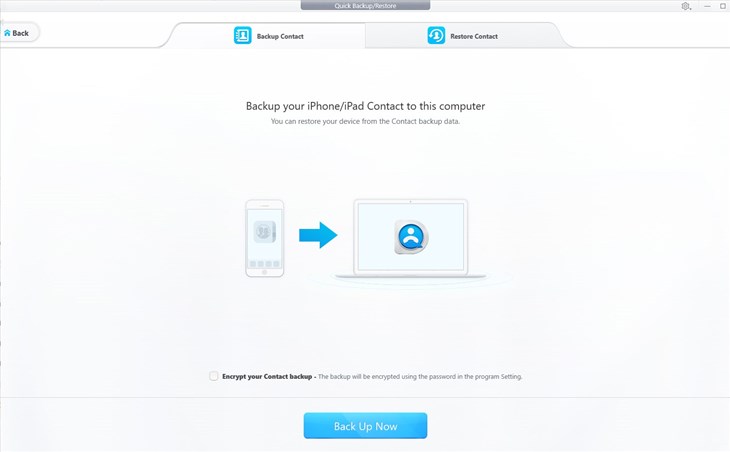
DearMob enable users to back up iPhone contacts in .bak file on your Windows computer in case that the important contact data gets lost. And when the contact data is missing, users can restore them from the backup file.
1. Click Quick Backup & Restore button, which would lead you to another page.
2. Choose Backup Contact and then click Back Up Now button to start.
3. Choose Restore Contact. Then the existed backup file would be shown up, select one which include what you are looking for, and click Restore Now to get them back on iPhone.
Sync iPhone Contacts with Windows PC
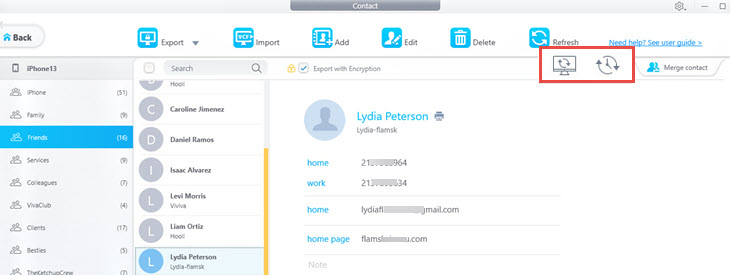
1. Click Sync contact to PC, and click OK, then it will be transferred to your Windows contact folder.
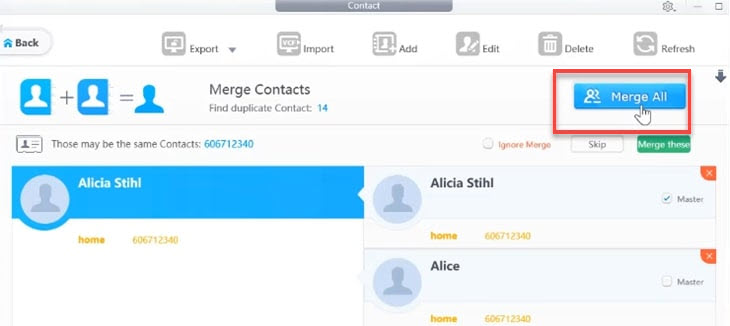
Merge Duplicate Contacts into One
1. Click Merge contact.
2. Choose one contact as the main, ie. master contact.
3. Click Merge All to merge all the duplicated contacts.
![]() Tips:
Tips:
- Click Ignore or Skip to skip merging this duplicated contacts.
- Click Merge These to merge current duplicated contacts.
- You can restore the merge by clicking Roll back to.
4. Hit Sync button to transfer the changes to your iOS device.
Frequently Asked Questions
How to Manage iPhone Contacts on PC?
Follow the easy steps below to manage your iPhone Contacts on PC:
1. Install DearMob iPhone Manager and launch the program.
2. Connect your iPhone to the computer. Tap “Trust this computer” to continue.
3. Go to the Contact module from the main interface.
4. Select the iPhone contact you want to edit.
5. Now you can edit the address, field, photo, etc.
How to Delete Multiple Contacts on iPhone?
Deleting multiple contacts on iPhone direcly can be tricky. Using an iPhone manager may be a more convinient and faster way to delete multiple contacts.
1. Install DearMob iPhone Manager and launch it on your computer.
2. Plug your iPhone and tap “Trust This computer” on the screen.
3. Click the Contact icon on the main UI.
4. Select multiple or all contacts on the left side.
5. Click Delete to delete them at one time. Then click “Sync” to allow DearMob iPhone Manager to synchronize the deleted contacts.
Also read:
- [New] In 2024, Mastering Audio Transitions in Premiere Pro
- [Updated] 2024 Approved Breakthrough Techniques for Enhancing Video Quality in Meet
- [Updated] 2024 Approved Professional Broadcasting Tools Excluding OBS
- [Updated] Audience Retention Through Reel Magic Boomers on IG for 2024
- Android Unlock Code Sim Unlock Your Tecno Pova 6 Pro 5G Phone and Remove Locked Screen
- Best Top-Rated Tracking Applications: Finding Your Lost Android Device
- Expert Tips for Reviving a Dead Phone Battery: Proven Methods to Bring Your Device Back to Life
- How To Ensure Uninterrupted Play in Resident Evil 4 HD: Fixing Common System Breakdowns
- How to Restore and Fix Broken Android Phones: Expert Techniques for Data Preservation
- How to Use Google Assistant on Your Lock Screen Of Realme Note 50 Phone
- Mastering Rooting on Android: A Comprehensive Tutorial Using Kingo Root Software
- Navigating Emergency Bootstraps: The Ultimate Tutorial on Operating Android Devices in Safe Mode
- Repair Guide: How to Mend a Damaged Smartphone Display
- Restaurazione Completa Di Messaggi Cancelati Dall'iPhone - Guida Dettagliata
- Simple Steps: Effortlessly Unlocking Your Android Device with a Quick Jailbreak
- Simple Troubleshooting Steps to Resolve App Installation Issues
- Troubleshooting Common Issues with Windows 10 Built-In Applications
- Title: Step-by-Step Guide: Syncing and Editing iPhone Contacts via Windows PC Using DearMob
- Author: Daniel
- Created at : 2025-02-16 03:57:29
- Updated at : 2025-02-20 05:21:07
- Link: https://os-tips.techidaily.com/step-by-step-guide-syncing-and-editing-iphone-contacts-via-windows-pc-using-dearmob/
- License: This work is licensed under CC BY-NC-SA 4.0.