Step-by-Step Instructions for Managing iOS Files Using Windows Systems | DearMob User's Compendium

Step-by-Step Instructions for Managing iOS Files Using Windows Systems | DearMob User’s Compendium
Disclaimer: This post includes affiliate links
If you click on a link and make a purchase, I may receive a commission at no extra cost to you.
How to Transfer and Manage iOS Files on Windows
Most iPhone file managers are limited to some types of media files, say, photos, videos, and music on iPhone. But DearMob iPhone Manager is capable of managing virtually any type of media files, data, and documents on iPhone, such as Photos, Music, Video, Files, App, SMS, Book, Podcast, PDFs, and Voice. It gives you a better experience in handling iPhone files on a PC.
Export Your iOS Files to a Windows PC
In DearMob,
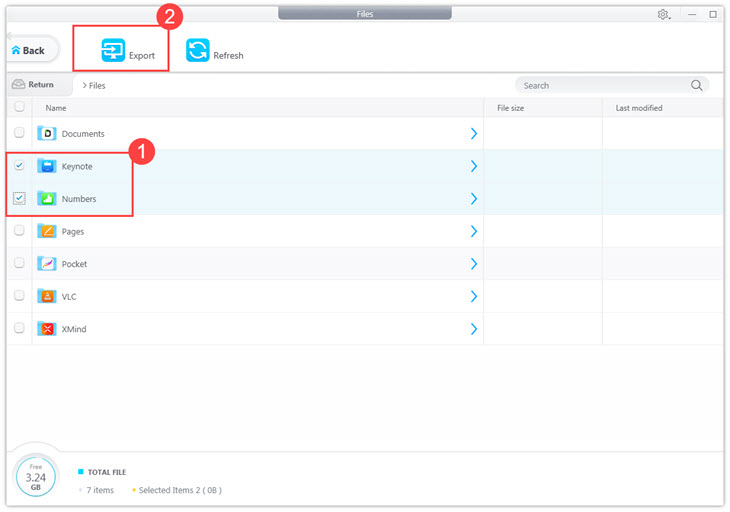
iWork files, including documents, spreadsheets, and presentations created in Pages, Numbers, and Keynote can be exported and viewed on a Windows PC.
1. Connect your iDevice to the computer with a cable before launching DearMob iPhone Manager.
2. Enter File and double-click one of the apps. Then click Export on the top and then you can find the files on your computer local drive.

![]() Tips:
Tips:
- Make sure your iDevice is iOS 11 or later.
- Click the box next to the Name button to select all the apps/files.
- It is suggested to change a new location for your exported items, otherwise, all files will be stored in driver C by default.
- As iWork files are iOS- orientated, you need to convert to Windows-compatible before viewing.
Import Local Files from PC to Your iPhone, iPad, or iPod
In DearMob,
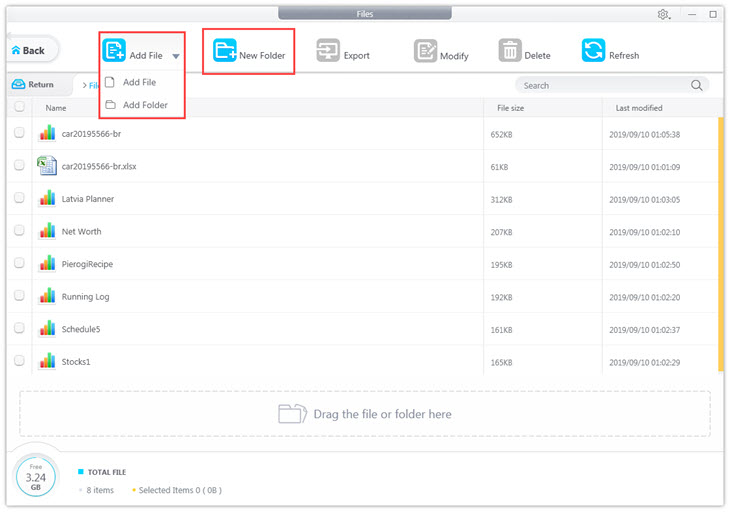
You are allowed to create a new folder by clicking New Folder for a better organization in the app (enter File and double-click one of the apps), which is impossible in iTunes.
1. Connect your iDevice to the computer with a cable before launching DearMob iPhone Manager.
2. Enter File and double-click one of the apps., and you can add any local files to that app.
![]() Tips:
Tips:
- Click Add File to import the file(s) to the app. Or you can click Add Folder to import a folder of files to the app. Besides, you are allowed to drag and drop the file/folder to the empty place for adding directly.
- All added files can be found in the Files App on iDevice.
Modify or Delete Files from Your iOS Device
In DearMob,
Follow the instruction for modifying and deleting files:
1. Connect your iDevice to the computer with a cable before launching DearMob iPhone Manager.
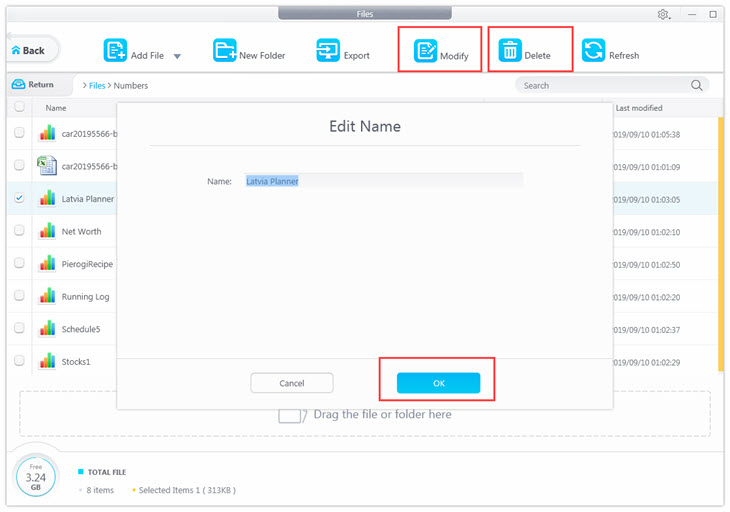
2. Enter File and double-click one of the apps. Then select a file and click Modify, then type the file name in the box. At last, choose OK to confirm renaming.
3. Enter File and double-click one of the apps. Select one file or some files, and click the Trash icon to remove the file(s) from your iDevice. At last, choose OK to confirm deleting.

![]() Tips:
Tips:
- You can only manage your local files on the device but are not able to access files on the cloud.
- Click Name on the top-left to view files in ascending or descending order.
Frequently Asked Questions
How do I transfer large files from iPhone to computer?
You can transfer many large files from iPhone to PC fast using DearMob iPhone Manager. For example, it transfers 100 UHD photos in about 8 seconds. And we suggest you choose USB connection instead of a Wi-Fi connection to avoid slowness or freezing caused by the network condition.
How do I send a large file from iPhone to computer wirelessly?
DearMob iPhone Manager helps you send a large file after connecting your device via Wi-Fi easily:
1. Download and install the DearMob software;
2. Launch DearMob, and connect your device via Wi-Fi following this guide ;
3. After the network connection, choose the file type on the interface, and click Export to send the file from iPhone to your computer.
How do I transfer all files from my iPhone?
DearMob iPhone Manager features a full backup mode that can transfer all files for you:
1. Connect your iPhone to your PC via USB or Wi-Fi connection.
2. Check “Trust This Computer” on your iPhone screen.
3. Go to DearMob iPhone Manager, choose “Backup & Restore”, click “Back Up Now” to start transferring all files from your iPhone to computer.
Also read:
- [Updated] Camera Selection for Amateurs
- [Updated] Chart a Course to Popularity The Fundamentals of Channel Featuring on Youtube for 2024
- [Updated] Simple Android Recording Without Rooting Steps for 2024
- [Updated] Ultimate Mac Guide to Saving Roblox Adventures
- Cease Android Application Collapses with These 7 Proven Fixes
- Comprehensive Assessment: Discover the Endurance of HP's OmniBook X with Snapdragon Chip Power
- Discover Root Exploration Techniques: Effective Strategies to Handle Files on Your Rooted Device
- Examining YouTube's Noteworthy Chats for 2024
- How to Resolve 'Printer Offline' Issues: Expert Tips From YL Computing
- In 2024, What Is a SIM Network Unlock PIN? Get Your Lenovo Phone Network-Ready
- Live Broadcasting Made Simple A Practical Guide for 2024
- Lost Your Android Lock Screen Code? Easy Steps to Regain Access
- Reviving Battery Life: 7 Proven Strategies to Get Your Android Phone Charging Again
- Step-by-Step Guide: Gain Full Control Over Your Android Device Using KingRoot
- Troubleshooting Your Smartphone: Why It Won’t Power Up & Effective Solutions That Work
- Ultimate Guide to Accelerating Android Devices: Discover the Leading 10 Boosters for Peak Performance
- Ultimate Guide: Unlocking Techniques for Android's Security Measures - Patterns & Passwords
- Unlocking an Android Device Without a Password: Simple Solutions Explored
- Unveiling the Ultimate List of Open Source Neural Network Image Makers (Top 5 Picks)
- Title: Step-by-Step Instructions for Managing iOS Files Using Windows Systems | DearMob User's Compendium
- Author: Daniel
- Created at : 2025-02-12 17:04:40
- Updated at : 2025-02-20 00:19:11
- Link: https://os-tips.techidaily.com/step-by-step-instructions-for-managing-ios-files-using-windows-systems-dearmob-users-compendium/
- License: This work is licensed under CC BY-NC-SA 4.0.