Step-by-Step Tutorial: Configuring iMessage Timers & Reminders

Step-by-Step Tutorial: Configuring iMessage Timers & Reminders
Quick Links
- Can You Schedule a Text on iPhone?
- How to Schedule a Text Message on iPhone
- Delete or Disable Delayed Text Messages on iPhone
Key Takeaways
You can set up an automation in the Shortcuts app to schedule a delayed text message on iPhone. Choose the time of day, enter the message and recipient, and save the automation. Remember that the scheduled message will repeat automatically unless you disable or delete it.
Sometimes it’s best to create a text message while you’re thinking of it. But what if you don’t want to actually send it until later? Here, we’ll show you how to send a scheduled text message on iPhone at whatever time you prefer.
Can You Schedule a Text on iPhone?
Yes, but it requires a workaround. As of November 2023, there is no built-in feature to schedule a text message. That doesn’t mean it isn’t possible, however — it just requires a bit of tinkering first.
One simple solution is to set a reminder using the Reminders app on iPhone. Then, when you receive the reminder, simply type and send your message at that time. However, that requires you to have access to your phone at the time you planned, which may not be the case.
To schedule a prewritten text message that sends automatically, you’ll need to set up an automation using the Shortcuts app. It may not be the ideal solution because it does take a few minutes to set up. Plus, you must remember to remove the automation if you don’t want the message to repeat. But it’s the delayed message solution closest to what you probably want, though, and below are the steps for this method.
How to Schedule a Text Message on iPhone
To get started setting up a delayed text message, open the Shortcuts app on your iPhone. If it’s one you’ve removed, you can redownload it for free on the App Store .
Select the Automation tab at the bottom and tap the plus sign on the top right. Then, choose “Create Personal Automation.”
If you don’t have any automations tap “New Automation” in the middle of the screen instead.
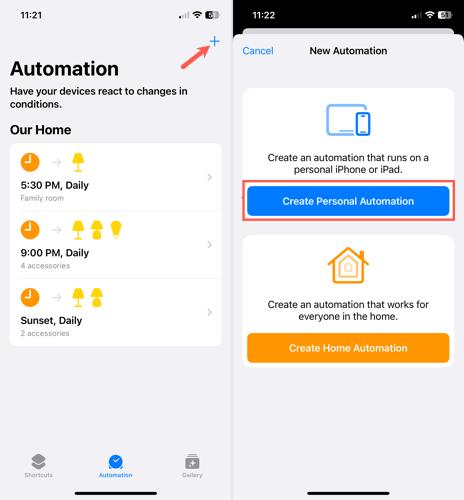
At the top of the next screen, pick “Time of Day.” On the subsequent When screen, choose “Time of Day” and pick the time in the box that appears.
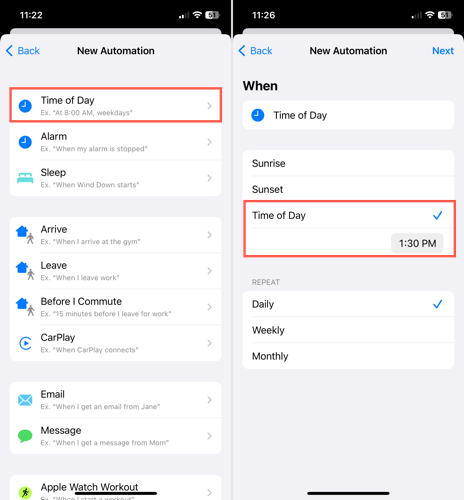
Alternatively, you can pick Sunrise or Sunset and choose an offset. For example, if you’re recipient is an early bird, you can select a time around sunrise.
Under Repeat at the bottom, choose Daily, Weekly, or Monthly. This is convenient if it’s a message you want to send regularly, such as a reminder for a family member. You also need to pick “Run After Confirmation” or “Run Immediately.”
Run After Confirmation will send you a push notification that you have to approve before the Shortcut will run, whereas Run Immediately will send the message at the scheduled time without any manual intervention. We opted for Run Immediately with a notification when it executes, but you can pick whichever you prefer. Once you’re ready, tap “Next.”
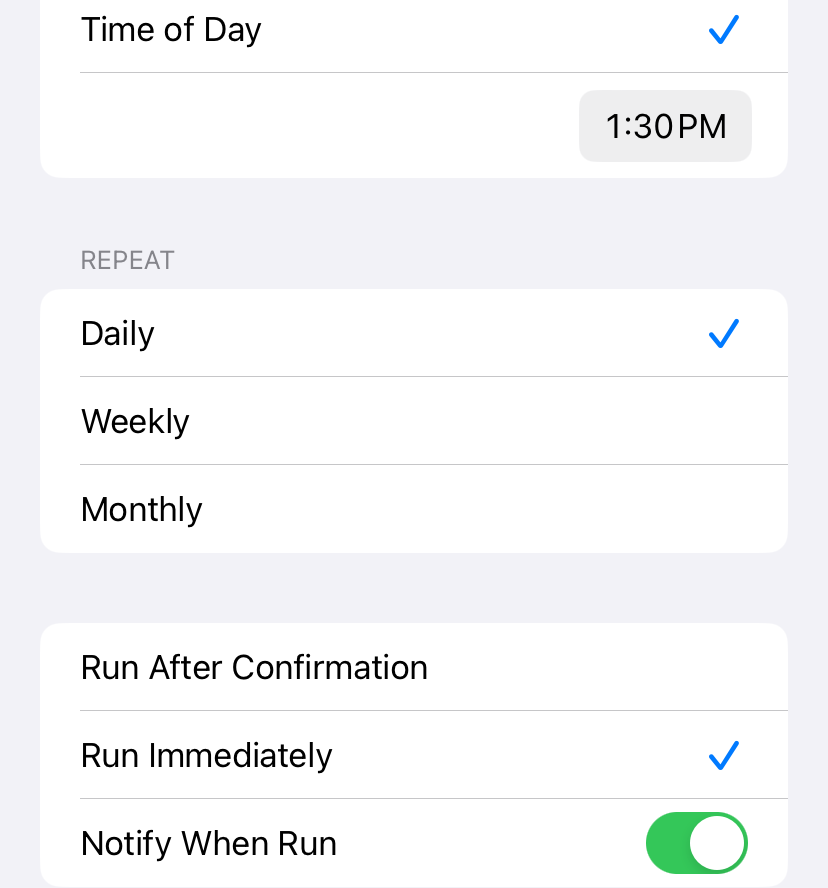
Although you may not want your text message to send continually, the repeat setting is required. If you want to schedule a one-time message, you’ll simply remove the automation after it finishes, which we’ll explain in the next section .
On the Actions screen, expand the Next Action Suggestions section and pick “Send Message.” If it isn’t visible, enter “message” in the search bar at the top to find it.
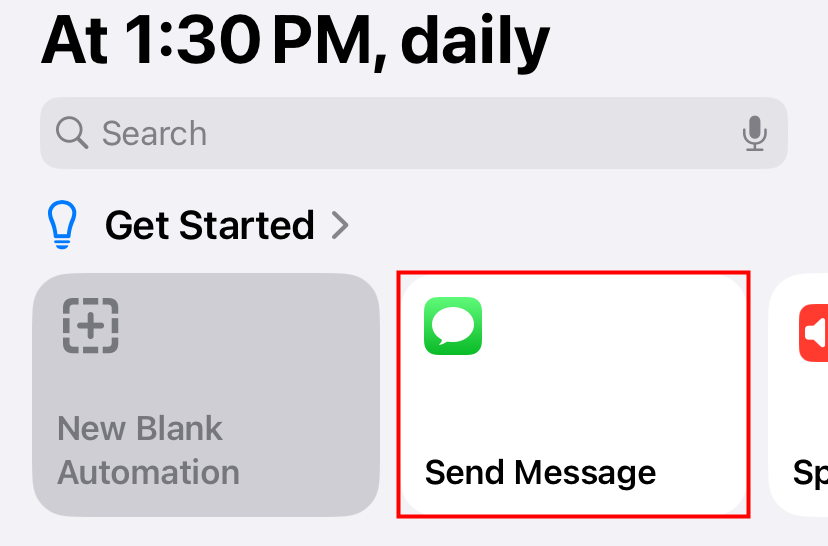
Then, on the subsequent screen, you’ll use the top box to set up your text.
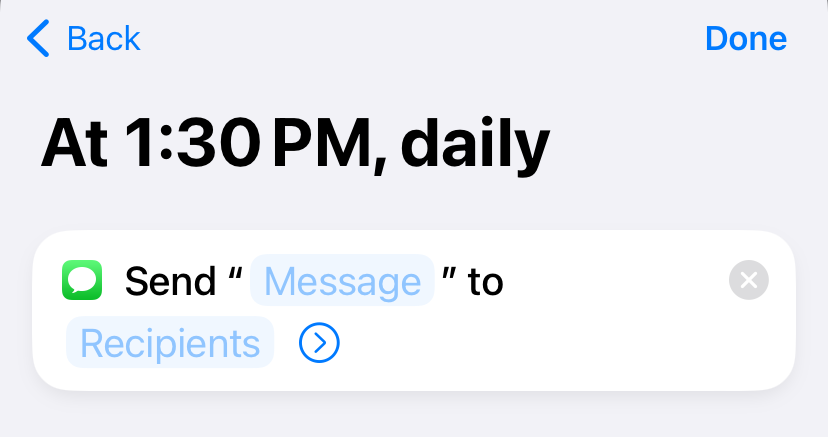
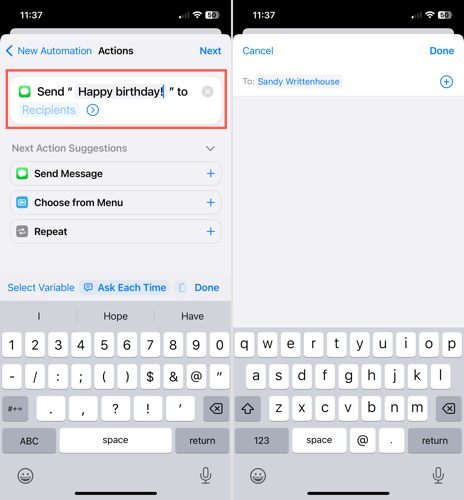
Tap “Message” in blue and type your text. Then, tap “Recipients” in blue, select or enter a contact , and choose “Done.”
You’ll then see the text message and recipient in the box. If you’re happy with it, tap “Done” to finish.
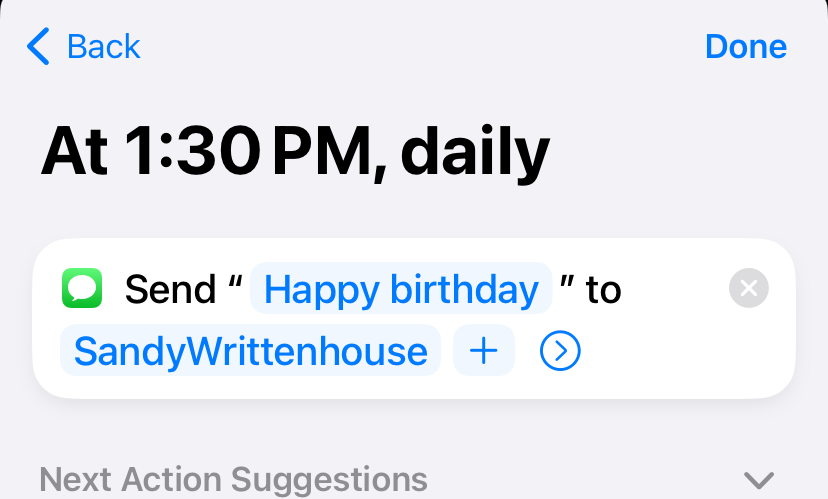
You’ll then return to the Automation screen in the Shortcuts app. You can schedule another text message the same way or simply close the app.
Delete or Disable Delayed Text Messages on iPhone
If you only want a one-time scheduled message, you can delete or disable the Shortcuts automation after your text is sent . Consider scheduling a reminder for yourself or a note in your to-do app to stop the automation after it’s complete.
When you’re ready to delete or disable the scheduled text message task, return to the Automation tab in the Shortcuts app and do one of the following:
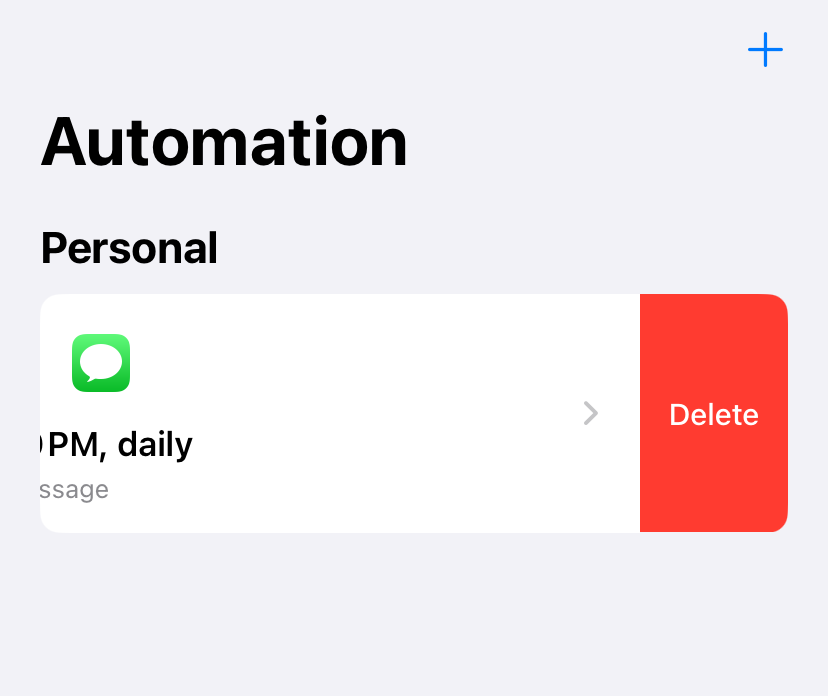
To delete the automation, swipe it from right to left and pick “Delete.” You won’t be asked to confirm, so be sure you want to remove it before tapping Delete.
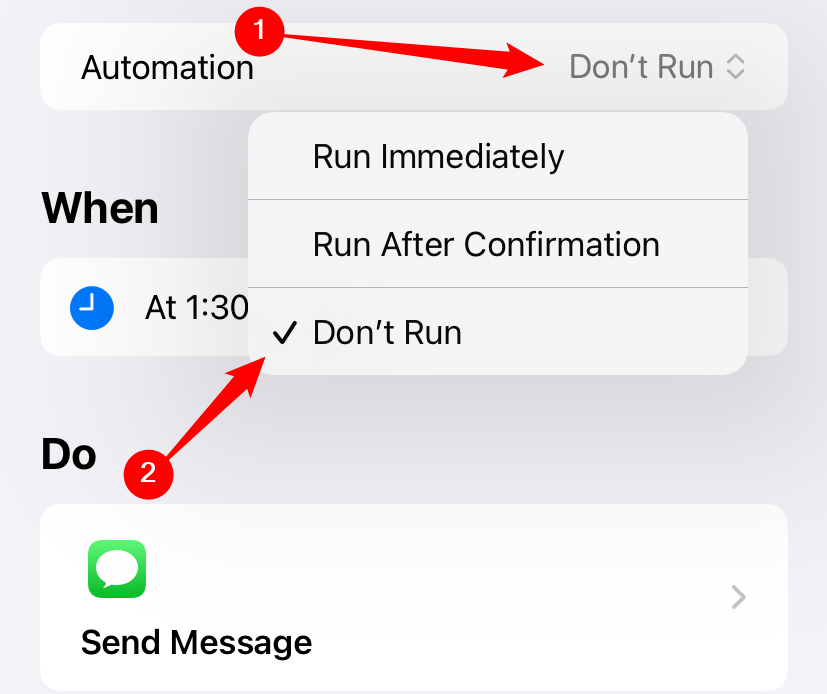
To disable the automation, select it, tap “Automation,” then select “Don’t Run.”
Apple offers a feature to schedule an email in the Mail app , so hopefully down the road, we’ll see a feature to schedule a text in Messages as well. In the meantime, at least you can schedule a text message on iPhone using Shortcuts.
Also read:
- [New] Leading Small Drones 2021 A Buyer's Guide for 2024
- [New] Navigating Video Visibility Barriers in Social Networking
- [New] Panning for Priceless Pieces in Open-Source Archives
- 2024 Approved IPad's Artistic Haven Top 8 Sketch Innovators
- Eat Healthy Foods Rich in Omega-3 Fatty Acids: Foods High in Omega 3’S Have Shown Promising Results when It Comes to Reducing Depressive Symptoms. These Include Fish Oils (Salmon or Tuna), Flaxseed Oil Capsules, Walnuts & Soybeans Amongst Other Sources
- Essential Tricks for Clearing Up iPhone Storage Issues Following the iOS N Version Release
- Get Your iPhone Navigating Out of Sticky Zoom with These 5 Guaranteed Fixes
- How to Repair Your iPhone's Alarm Function: A Step-by-Step Troubleshooting Guide
- In 2024, The Final Step Delete Your YouTube Shorts Link
- In 2024, Unhindered Video Capture App
- Introducing HP's Latest Innovation: AI-Enhanced Spectre Series Unveiled at CES, Complemented by Dazzling Accessories
- Quick Fixes for Eliminating Audio Echo on Your iPhone (Series 13-11, X)
- The Complete Handbook of GoPro Time-Lapse Photography Excellence for 2024
- Troubleshooting an Unresponsive Display: Repairing Apple's iPhone Touch Issues
- Title: Step-by-Step Tutorial: Configuring iMessage Timers & Reminders
- Author: Daniel
- Created at : 2025-02-15 17:08:41
- Updated at : 2025-02-19 20:14:13
- Link: https://os-tips.techidaily.com/step-by-step-tutorial-configuring-imessage-timers-and-reminders/
- License: This work is licensed under CC BY-NC-SA 4.0.